Archive | Side Dishes RSS feed for this section

Crockpot Applesauce

9 Nov

IMG_6996

Folks, before I dive in, I wanted to share some fun thoughts I have about sprucing up the blog. First, I want to infuse more creativity into what I post for you all (the “buttons” side of the blog, which is supposed to more about the crafty things and creative things I do outside the kitchen). I also wanted to create an easier way for you all to follow a recipe step-by-step instead of having to scroll the whole blog post to see each step. Don’t worry, I’ll continue to do my usual documentation of capturing photos as I go, but I also will now create a little recipe card summary for you all! I hope to make these creative and different for each recipe – all hand written by me! I hope this will make it event easier to replicate any of the recipes and have fun in your own kitchen, experimenting and producing delicious food. It will also allow some more creativity to hit the blog so it’s not ALL food ALL the time. Please let me know what you think about this! I love hearing from you, and I want to make this blog a place that you enjoy coming to, reading and having a chuckle…and then be inspired to go make something! Leave a comment below about the recipe card idea and if you think this would be something neat to go back and include as updates on all the old blog posts! 

This blog came about purely as a fun way to document the trials and adventures in the kitchen. I learn by doing and I love learning by finding other bloggers, cookbooks, cooking shows, etc. and trying out the fun foods I see on these blogs, cookbook pages or on the TV. I don’t always put my own twist on things (sometimes the original just doesn’t need any changes!), but I do always try to show you where I found the delicious recipes so you too can find some new places to go and read more about other tasty food concoctions you could try. I am doing my best to be more adventurous in the kitchen than when this blog started a few years ago. If I want to try my own twist on something – whether to be original and innovate or just because I don’t have all the ingredients something calls for – I will! Look forward to seeing more and more of those creative spins on recipes in the future blog posts coming to your computer/phone/iPad screen. 

Finally, last exciting thing I wanted to share with you guys…I think it’s a great time for another S&B Giveaway!! It’s been a few months since the last one, and with the holidays approaching – it just seems like a great way for me to say THANKS to my blog readers! I’ll post more details about the Giveaway later this week, but all you need to do to enter is to be a follower of the blog. Details to come, but get excited!

Alrighty, enough already. Let’s get to the applesauce! Don’t forget to scroll down to the bottom of the post for the recipe card that you can use to follow this as you make your own applesauce!

This recipe is adapted from Chocolate, Chocolate and More (a place I will HAVE to get more delicious recipe ideas, particularly for my sweet-tooth husband).

IMG_6998

Ingredients:

  • 7-8 apples (we had a variety from the apple orchard, but most were Courtland apples)
  • 2 tsp of ground cinnamon
  • 1 tsp nutmeg
  • 1/4 tsp Aztec seasoning (this is a specialty spice that Luke and I are currently obsessed with – gives a little extra ‘zing’. But if you don’t have it and your grocery store doesn’t have it, you can leave it out.)
  • 1 tsp allspice
  • 3/4 c. light brown sugar
  • 2-3 Tbsp lemon juice

How to Make:

This is super simple, guys. The beauty of a crockpot is it does all the hard work for you and the bonus – you get a kitchen that just smells DELICIOUS all day. Hard to top that!

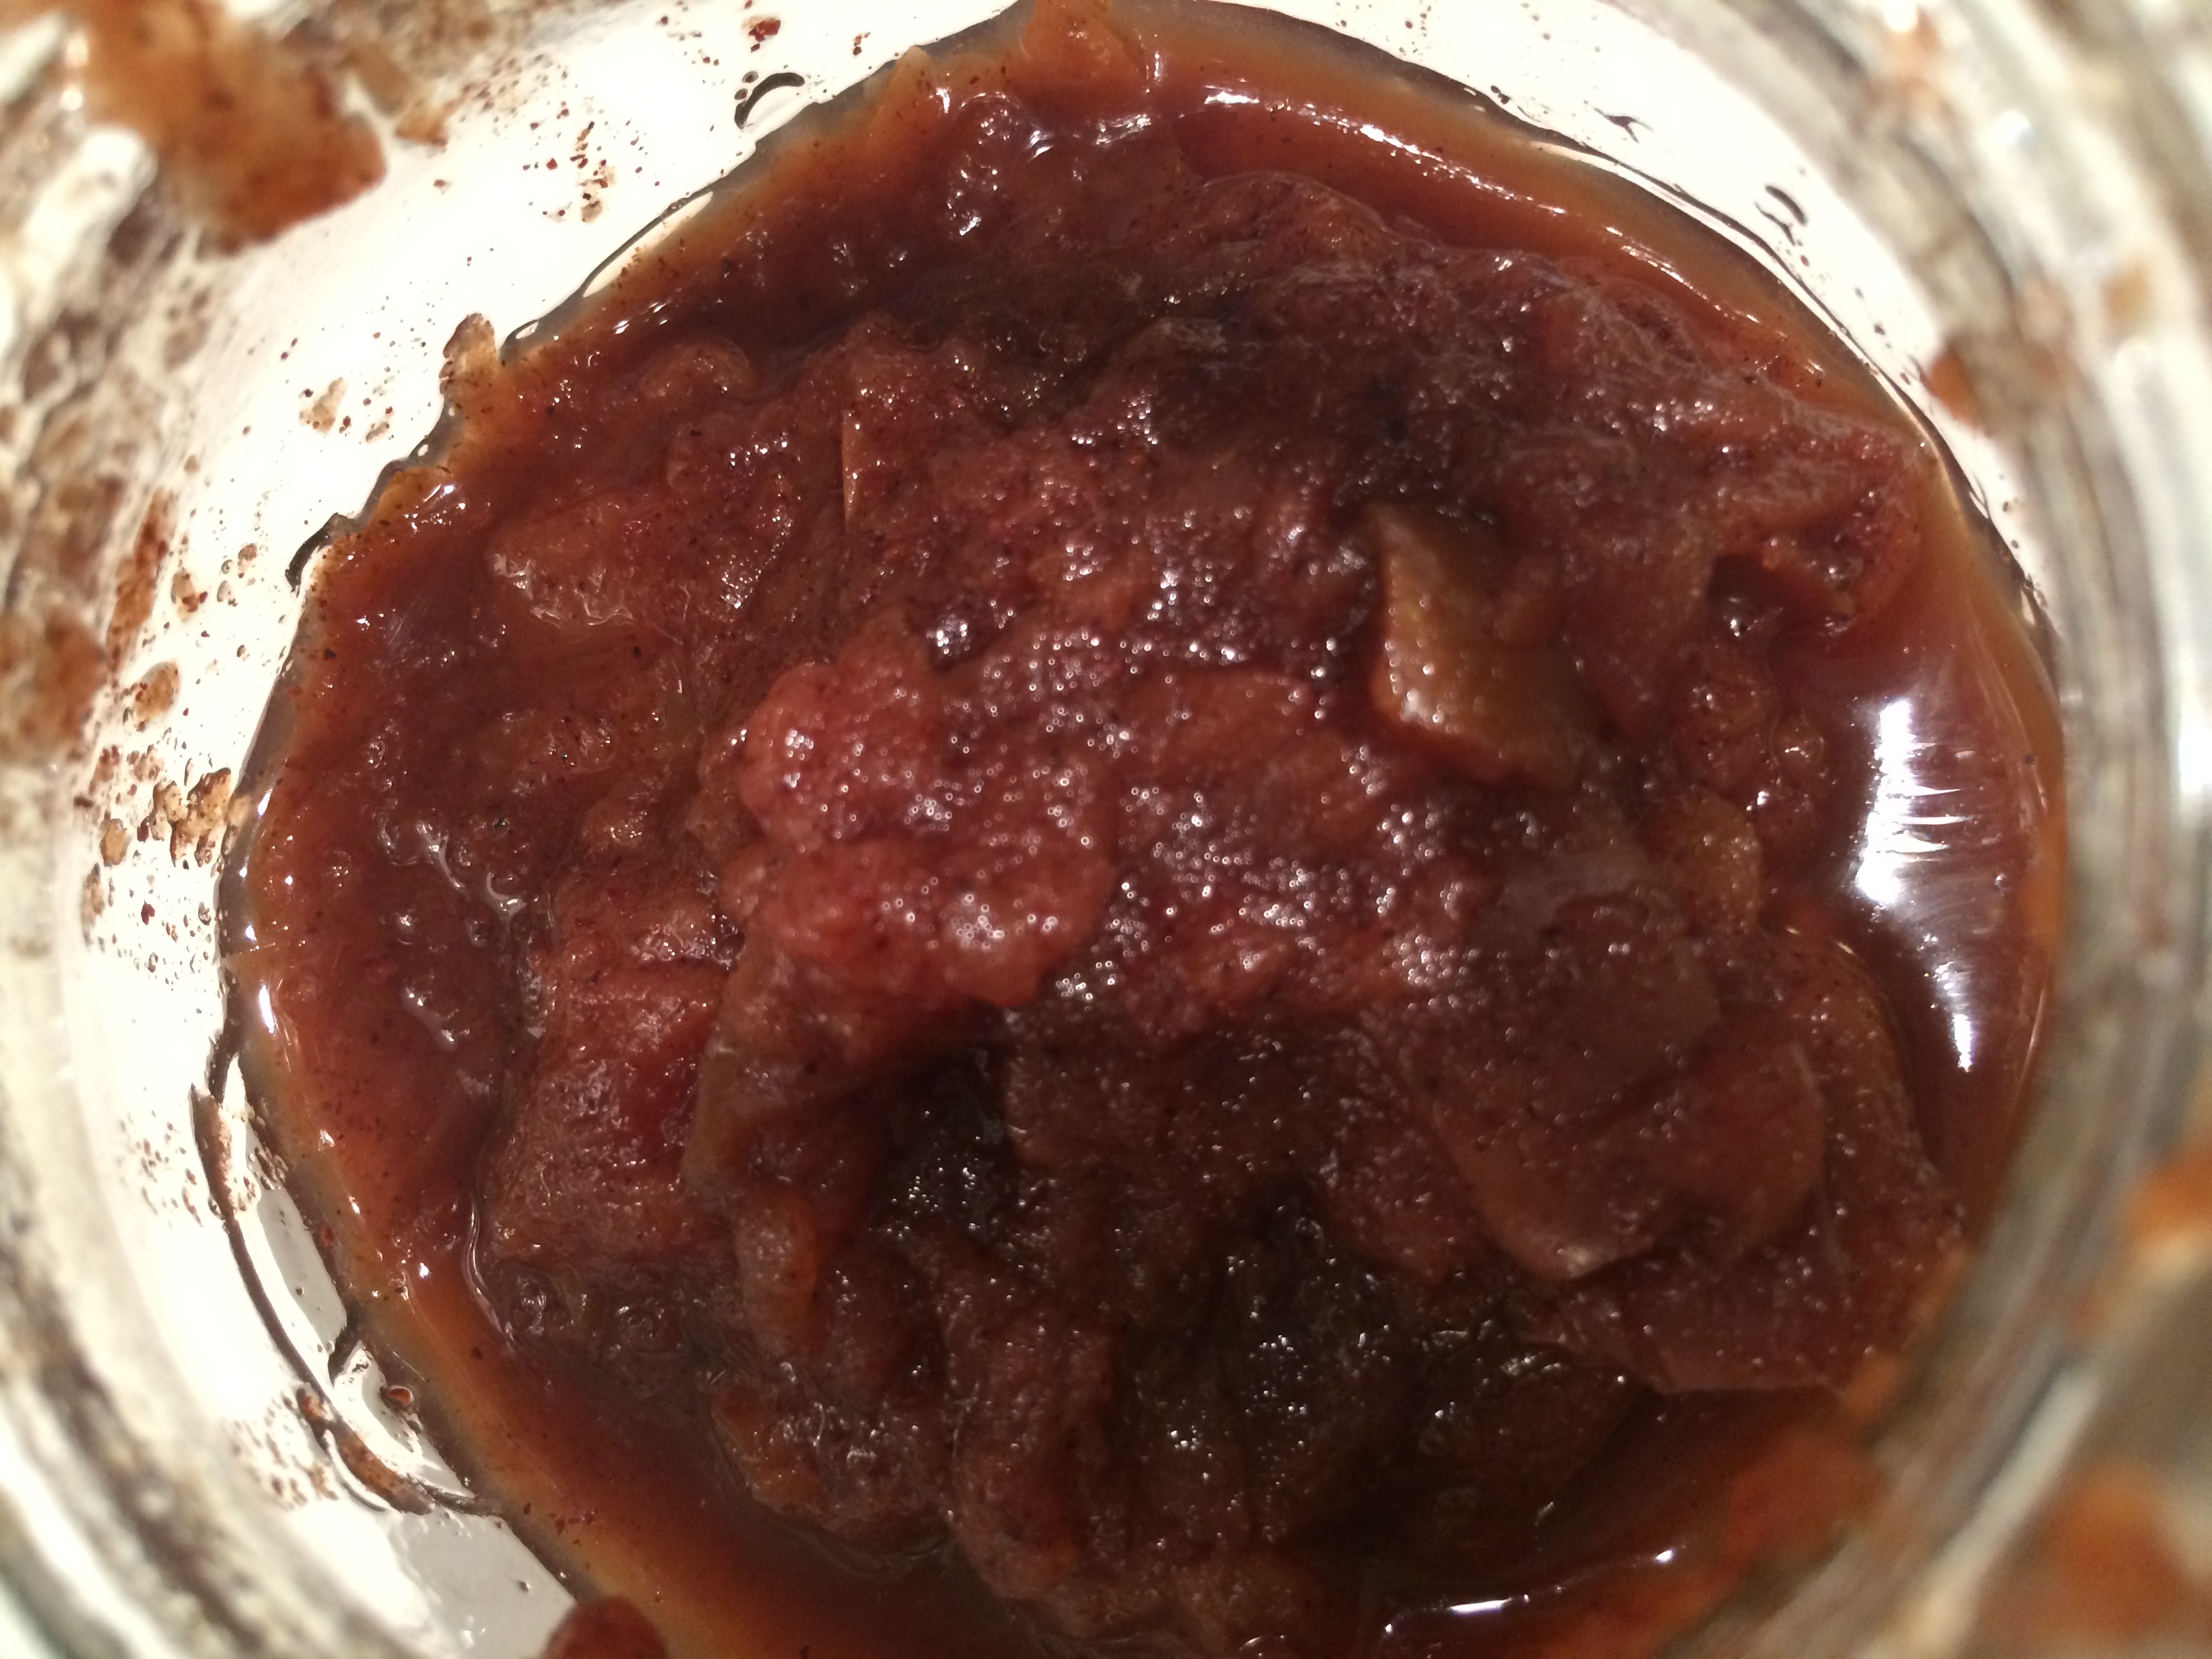
First, chop up the apples into small bite-size pieces. Once all your apples are chopped, throw ’em into a crockpot.

IMG_6933

Now, grab your spices and brown sugar. As you measure, just dump these right on top of the apples. Simple, right?!

IMG_6934

IMG_6935

Last, measure the lemon juice and sprinkle that over the top of everything.

IMG_6936

Last, use a big spatula to thoroughly mix all the spices/lemon juice/apples. Then, on goes the lid, set your crockpot on low and cook for 7-8 hours.

IMG_6937

I let mine go a bit longer than 8 hours which cooked things down even more (which I love). If you want less mushy applesauce, lean towards the 7 hour or even less. It’s all up to you!

IMG_6941

IMG_6943

I love applesauce cold, it’s a great snack and it’s the perfect Fall-spiced food to have at this time of year. However, you can also serve this up warm! It would be great on porkchops (warm) and also would be great with some crunchy granola (cold). Regardless how you serve it, you can store this easily in mason jars.

IMG_6944

IMG_6945

Here’s the helpful recipe card to assist you in your applesauce making! Cheers!

IMG_7003

Lemon Orzo Salad

8 Sep

Aug-Sept 2014 051

Ok folks, back at you with another post. I’m a roll and I figured there was no reason to stop posting if I was in the mood to share food. (Unintentional rhyming.). This is another one that falls in the side dish category and I thought it was one worth sharing with you guys because it’s a great, QUICK, and healthy and it’s one that you can throw into any meal. It’s versatile and it’s not going to take much of any effort from you. What more can you ask for, right?!

As summer is winding down, it’s also a great last use for fresh veggies from a farmer’s market. If you like that sort of thing.

Before I start hitting you with photos, did want to mention how much I love seeing your likes and comments on these posts! I’m only writing these so that you all can hopefully find something fun and different to explore with in the kitchen, spark some creative juices and get you thinking about what YOU want to make tonight or…at bare minimum…make you smile and chuckle as you read. Never be shy about leaving a comment – those are my favorite! And if you don’t already follow me, click that lovely little button in the upper right on my page and you’ll be in the loop with every post that gets published.

AND…as history has shown…you’ll likely be entered into future blog giveaways! What fun!

So. How did I happen upon making Lemon Orzo Salad?

This one goes to my husband…I was trying to come up with a new and different option for a side the night we had my parents up for dinner a few weeks ago. He mentioned trying to do something with orzo, as we had a fairly ginormous container in our pantry that we haven’t used for anything in recent months. And maybe he just had a hankering for some orzo?! Regardless, I thought that was doable, so began my searching for what to throw in WITH said orzo to make it a true ‘side’. The goal was to be able to combine grains and veggies in a side that was NOT boring and tasted really good.

Key thing in making that happen is truly the lemon. TRUST me when I say, don’t skimp on the lemon. It’s essentially the ‘sauce’ of this dish and it makes the orzo incredibly tasty and it mixes very well with all the veggies. And I’m not a crazy “I LOVE LEMONS” type of person, but this did it for me. (Sorry for shouting, but I do assume there are some out there that have passionate love for lemons.)

This recipe was a true keeper and is a twist on the Two Peas and Their Pod (blog post of Lemon Orzo Salad with Asparagus, Spinach, and Feta (go check ’em out…LOTS of good grub featured on their site). Can’t wait to make this again…

Ingredients:

  • 1 cup orzo
  • Pinch of salt
  • 3 cloves garlic, chopped/minced (you better believe I used my new garlic press for this…and it was more exciting than it should have been…I’m easily excited)
  • 1 teaspoon olive oil (if you have Garlic infused Olive Oil…even better…this is a new favorite of mine in the kitchen!)
  • 10-12 asparagus spears, cut into 1 inch pieces (I wanted to add more than the original recipe, and I didn’t think it overpowered the orzo one bit)
  • 1 cup/1 hearty handful of packed fresh spinach
  • Juice of 1 large lemon (yes…the whole lemon)
  • 1/2 cup feta cheese (added a bit more feta…because I wanted to)
  • Salt and pepper

How to Make:

First, must cook up that orzo. I followed the directions on the side of my orzo container to figure out the water to orzo ratio, but Two Peas in a Pod recommends about 4 cups of water to the 1 cup of orzo. Bring the water to a boil, sprinkling in your pinch of salt. Then dump in the orzo. Like any pasta, it can get a bit sticky, so stir it every few minutes so it doesn’t get clumpy.

Once it’s tender (which I use the method of…if I take a piece and chew it, does it have the right texture?! Yes, very elaborate method), drain it over the sink and set it aside. You will now be moving on to the green stuff…

Aug-Sept 2014 048
Before you cook up the green stuff (also known as asparagus and spinach), you want to start sauteing the garlic in your olive oil. And is there ANYTHING better on this planet than the smell of garlic heating up?! I THINK NOT!

(I’m easily excited today…apologies.)

While the garlic is heating up, chop up the asparagus into easy to eat pieces (about 1-2″) and then add them into the garlic pan, swirling them around to start to soak up all of the garlic juices. You’ll saute those for roughly 3-4 minutes and then add in the spinach.

Aug-Sept 2014 046

I was not as experienced with cooking up spinach and forgot how crazy small spinach shrinks down to! It won’t take long and your puffy pile of spinach leaves (as seen in photo below) will be shrunken WAY down. Don’t cook much beyond the spinach getting down to its teeny tiny state, as you want the asparagus and spinach JUST cooked and still bright green. Don’t overcook here folks…no one likes mushy veggies!

Aug-Sept 2014 047

Now locate your orzo and pour into the serving bowl you wish to use. (Another aside…I was so excited to get to pull out serving dishes that we received as wedding presents. I mean, sadly, that was one of the best parts about making a fun dinner and hosting was getting to use some of these dishes for the first time! Ok, I realize my whole enthusiasm for things in the kitchen may be somewhat pathetic, but hey. It floats my boat, people.)

Into said bowl, pour the orzo and the freshly cooked veggies/garlic concoction. Toss it all around to coat all the orzo.

Aug-Sept 2014 049

Slice a lemon in half and juice the WHOLE thing. Don’t be frightened by all the lemon juice…just trust me. It won’t be overly lemony and the veggies and orzo will soak it up and make every bite, sooooo sooo good. Don’t forget to add a few shakes of S&P to it too.

Aug-Sept 2014 050

Make sure to toss the lemon around to really get the whole mixture coated and before you serve – sprinkle that feta all over the top.

Aug-Sept 2014 051

NOM. Nom nom nom. Yes, you will be so happy to have this on your table. No more boring side dishes for you! And so simple, right?!

As a final aside, this is phenomenal the day after, whether you choose to warm it up or eat it straight from the fridge in it’s Tupperware container like yours truly. You can also easily double this recipe to make it for a larger group OR to ensure yourself some leftovers for dinner the next night.

Happy cooking and side dish making!

Tomato Pesto Pie

7 Sep

IMG_6200

Now although it may seem like we only eat sweet things in this apartment, there are MANY savory dishes that we’ve been making recently that I had noted for future posts to share with you. However, this particular post features something made yesterday that was just SO darn good, that I had to share it with you all today.

This particular recipe was one I pinned on Pinterest, close to 2 years ago. I thought that it looked gorgeous (which is what caught my eye), but it was also a creative spin on your typical ‘pie’ as well as different type of side dish.

Side dishes are always a spot that I want to experiment with. Of course, we have some fallback staples that are our favorites (my husband LOVES TBM Salad, and we make it at minimum, twice a month), but I am usually looking to try something new and different, even if we’re using the same flavors. As you’ll see, the TBM Salad ingredients are all still present in this dish, just prepared in pie format and with a twist.

We were tasked with bringing a side for a dinner with some friends last night, and knowing we had plethora of tomatoes around the apartment and a pie crust (left from the recently made Sour Cream Apple Pie) – my mind went to this Pinterest pin, from so long ago.

Now, if I made this again I would love to use a few different ingredients – perhaps make some fresh, homemade pesto first, fresh basil and use some light mayo with olive oil (or even greek yogurt).

But that’s for a different time.

And I can tell you, the full-fat and easy version was DELICIOUS. Four of us (and later a fifth who stopped by) devoured the entire pie last night. So whether you choose to lighten this up or not, I think this is a pretty foolproof recipe.

The recipe I used is a tweaked version of what Your Homebased Mom posted for her version, called Tomato Basil Tart.

Ingredients:

  • 1 refrigerated pie crust
  • 1 1/2 cups of shredded Mozzarella
  • 2-3 medium tomatoes, sliced
  • 1 cup of yellow cherry tomatoes (this adds both a pop of color and great flavor to mix in with the larger tomatoes)
  • 1/2 cup of pesto (store-bought OR homemade if you’re fancy and have the time!)
  • 1/2 cup of mayo (I used the full-fat version but you can lighten it up with a lighter mayo version or even mayo with olive oil)
  • 1/2 cup of shredded Parmesan cheese (with extra saved for sprinkling on top)
  • 1/8 tsp white pepper
  • 1 Tbsp of dried basil (or chopped fresh basil, if you have some on hand!)

How to Make:

Similar to the apple pie I posted about yesterday, you start this guy off by baking the refrigerated pie using the instructions on its box – make sure to use the 1 pie crust, filled pie version.

IMG_6181
While it’s baking, shred your mozzarella cheese (and sneak some…because you can). You want this to be all ready when the pie crust comes out!

IMG_6182

Now, instead of letting the pie crust cool before we use it, you’re going to pile the mozzarella inside. I used all 1 1/2 cups and then spread it out so the bottom was all covered. The pie crust’s temperature will start to get the cheese all melty and wonderful.

IMG_6183

IMG_6185

While that’s melting and looking tasty, slice and chop up your tomatoes. We were excited to use a mix of medium tomatoes and some yellow cherry tomatoes (Luke and I really have a thing for cherry tomatoes), not only to use up all the tomatoes we had, but it adds two great colors to the dish AND slightly different flavors. I sliced up about 2.5 medium red tomatoes and then chopped about a cup of yellow cherry tomatoes, halving them.

IMG_6186

Now, before the tomatoes go in, spoon out your pesto on top of the mozzarella. Spread it evenly across, and then it’s time to layer on the ‘maters! Layer as evenly as you can, so no matter what slice anyone gets, there’s a great mix of red and yellow tomatoes.

IMG_6187
IMG_6190

IMG_6188

It sure does look great, doesn’t it?!

IMG_6189

But we’re not done!

Now, mix up your mayo, parmesan cheese (which I bought already shredded) and the white pepper. The white pepper gives just a hint of zip, which mixes so well with the rest of the flavors of the pie.

IMG_6191

Once the creamy mixture is ready, spread this as evenly as you can on top of the tomato layer.

IMG_6193

Then, pop the pie into a 375 degree oven for 35 minutes! When there’s about 10 minutes to go, I pulled the pie out and sprinkled the whole thing with a little extra parmesan cheese. Just because.

IMG_6194

Once it’s all done, pull it out and let it cool, sprinkling the top with dried basil.

IMG_6196

Looks SO good!

Slice this up warm for family and friends, cutting it just like a normal pie. The slices may not all look perfect on a plate, but let me tell you the tomato juices, the creamy tang of the mayo and white pepper, the savory pesto and the flaky pie crust make this a side dish that you’ll want to DEFINITELY make a fallback favorite.

IMG_6199

IMG_6200


Tomato, Basil & Mozzarella “TBM” Salad

12 Aug

Now, I’m not fully sure “TBM” is a real name for a salad. To be honest, it reminds me of “TPM” from Hoover Elementary. (Time…Place…Manner. Duh. Completely unrelated. Sorry.)

TBM = Tomato…Basil…Mozzarella. The main ingredients in a reasonably simple salad that I never thought about making before I stumbled upon the recipe here. Just another fantastic food blog that I’ve added to my reading library. You should too – Savory Sweet Life. Look it up. (Or click the link.)

This is a GREAT summer salad but it could also be enjoyed in our other three seasons. Fresh basil is the key.

Trust me.

Ingredients:

  • 1 pint cherry tomatoes, halved (I like a mix of red and yellow – more colorful.)
  • 8 ounces fresh “mini” mozzarella pearls (These work better and are much prettier next to the cherry tomatoes.)
  • 4 tablespoons olive oil
  • 18 basil leaves, chopped (Go fresh!)
  • 1/2 teaspoon Kosher salt
  • 1/2 teaspoon freshly ground pepper

How to Make:

This is a hard recipe. Roll up your sleeves. Put on a sweatband. Whatever revs you up.

Ok, ok you caught me. This is probably the easiest recipe on the planet. And you know I don’t exaggerate. Ever.

(Only sometimes.)

Chop the tomatoes….


Toss ’em in a bowl…

Drain the mozzarella pearls…maybe eat a few, just to test them out. Then throw ’em in the bowl too…

Roll your basil leaves into a long cylinder…

slice it up…


…throw it in your bowl.

Pour in the olive oil…

Sprinkle in the S&P…


Mix it all up.

Drum roll………………………..(it’s a long roll)……

You’re done!

Painless.

This truly is the simplest salad ever but it looks gorgeous and it goes with just about any main dish you can imagine. It’s even a great snack if you’re looking for a little something that falls more in the healthy category and it’s not quite meal time.

Had it with some steak and grilled corn recently. Highly recommend.

I hope you give this one a go – and please let me know if/when you do! I always love your comments and likes if there’s a recipe/post you really enjoy!

Da Mama’s Potato Salad

6 Apr

Be prepared for several blog posts in the next few days – I have been a cooking machine! With assistance, of course. The majority of recipes coming up will be some “Vose Favorites” which are either homemade recipes or passed down through my parents.

First up is one of my personal favorites, great for Spring or Summer in particular. It’s my mama’s potato salad – Da Mama as she is often referred to. She made up this particular concoction, as many probably do with their potato salad recipes. I love this one because it’s both simple and full of bacon. I have no shame in admitting the latter.

You don’t need a terrible amount of ingredients:

Ingredients:

  • 5 big Idaho potatoes – peeled and diced in quarters (or smaller pieces if they’re extra massive)
  • 1 celery stalk – diced
  • 2 hard boiled eggs – diced
  • 4 slices of bacon – diced
  • 1 tsp of relish
  • 1/2 cup mayonnaise (you can always add more as you go, but start with between 1/4 and 1/2 cup)
  • Salt and pepper to taste

How to Make:

First up – locate two eggs.

Plop them into a saucepan with water and a dash of salt – boil them up. As soon as the water begins boil, put the lid on the saucepan and turn off the heat. Let it sit for 30 minutes. This is Da Mama’s process.

Meanwhile….grab your potatoes and your potato peeler. At one point, when I made Mom’s potato salad I had no utensils as I happened to be living in Europe and was dirt poor…I used a knife. If you choose the latter method – just be careful and don’t peel anything other than the potato. I speak from experience. Ouch doesn’t quite cover it.

If you have a sous chef – as I happened to last evening – have them dice up the celery while you’re peeling potatoes. Please harass them throughout the dicing/peeling process. It’s a necessary step.

Once you’ve peeled your potatoes, slice them in 4 or 6 pieces each, depending on the size. Note the nicely stacked diced celery. Nicely done sous chef.

Then pop the potatoes into a pot with water high enough to cover the potatoes. Boil them until when you stick them with a fork, the fork can easily splice the potato. Avoid overcooking – consistency of cooked carrots (aka gross mush). Avoid undercooking – consistency of apples (aka crunchy).

After your eggs sat for their 30 minutes with the lid on, pour out the water and pour in cold water instead. Again, let your eggs hang out for 30 minutes in their new cold water bath. This is the continuation of the Da Mama’s process.

Now it’s bacon time! Grab four slices and lay them on top of a paper towel upon a large dinner plate. Pop into the microwaved and heat in 1 minute increments, flipping them each time. Or, if you’re into the stovetop cooking – fry up your bacon that way. Depends on how much time you’d like to devote to both cooking the bacon and cleaning the splatter after. I usually cook via stovetop – but Mom insisted with the microwave to both save time and her stovetop from grease dots.

Once your bacon is thoroughly cooked, dice it up into small pieces. When the potatoes are cooked – dice them up into bite size pieces and throw them into a bowl. Dice up the hard boiled eggs too once they’ve finished their cooling process. Throw in the celery too.

Throw in the mayonnaise. Start with only a bit…about 1/4 cup. Stir it in and assess how much you need to add in. I added just about 1/2 cup total. Mix in all in. Everything should be lightly coated but not glooping (is that a word?) with mayonnaise. That would be gross. Don’t do it.

Now, add in your bacon. Doesn’t it look excellent? It MAKES the potato salad. I’m not joking. One bit.

At this point you can also add in your tsp of relish. Mix it all in – salt and pepper it up as well. More pepper than salt. Lotsa (yes, that’s a word) of pepper according to Da Mama.

You have now made the best potato salad on the planet. Be very pleased with yourself. Then, dish yourself a nice full dish and devour it. Maybe you even want a nice full larger dish. No judgment from this person. Mmm…Da Mama’s Potato Salad.

Creamy Bacon Cheese Grits

25 Mar

Something I recently tried and loved – grits. This was on that same trip to Memphis that I mentioned a few posts back. I had shrimp and grits while out to dinner with my friend Marissa one night. They were so much better than I ever imagined them to be. All those times I imagined grits. Which happens a lot. Not really. But I didn’t expect them to be as delicious, lets just say that.

When I got back from my trip and made my next grocery store excursion – I went and found some grits. I knew I’d have to give them a whirl in the kitchen…but wasn’t yet sure what type of recipe I’d use them in.

My bff the Pioneer Woman (we may just be bffs in my dreams, but that’s ok) has a few delicious recipes for grits on her website. I decided this weekend I was going to make them and looked through some of the varieties she had posted. One stood out – Creamy Bacon Cheese Grits. Doesn’t that sound fantastic?!

I had a relaxing Saturday night in and cooked away while watching the Notebook. Pretty ideal in my world, but I realize that may seem rather dull to my peers. That’s alright – judge away!

Back to the grits which are fairly easy to make:

Creamy Bacon Cheese Grits:

Ingredients (to make 6 servings, which is cutting the recipe Ree posted in half):

  • 4 slices Regular Bacon, Cut Into 1/2-inch pieces (I like bacon, so I left mine in larger chunks. Up to you and how much you love bacon.)
  • Half of a whole Yellow Onion, Chopped
  • 1 cup Stone Ground Grits (I used stone ground white grits, but I believe any type should work!)
  • 2 cups Low Sodium Chicken Broth (I’m a moron and grabbed chicken stock at the store instead…but I looked up if this was a decent substitute and it is. But for the legit recipe, broth is recommended.)
  • 1 cup Water
  • 1 cup Heavy Cream
  • 3/4 cup Grated Cheese (I used a Colby & Monterey Jack version)
  • 1 dash Cayenne, For Heat
  • Salt As Needed
  • Black Pepper To Taste

How to Make:

Here we go! Grab a cutting board and the bacon and start slicing it into 1/2 inch (ish) pieces. As I stated above, mine were a bit larger because I love bacon. But up to you. Throw the diced bacon in a big pot over medium heat for a few minutes (I went for about 4 min).


Then add in the onions to cook with the bacon for a few more minutes (I gave this about 5 ish min). The bacon should be “chewy and onions are golden brown” when this step is complete, according to my bff, the Pioneer Woman.

Next is adding the grits, chicken broth (or chicken stock in my case) and the water. Stir it all up together and wait until it comes to a boil. At that point, reduce the heat so it can simmer  for about 30-40 minutes. You’ll want the lid on the pot for this simmering process.

Throw your spoon in there every now and then to give a quick stir. Don’t reach it and taste test the onions, bacon and grits combo. That’s bad…but it tastes SO good. (I did this on average 3.8 times. No judgment from me if you taste test.) If your grits start to look dry, splash in a bit more of the broth.

After the 30-40 minutes of simmering has passed, it’s time for the beloved cream. Pour it in! Put the lid back on and simmer again on low heat for another 30 ish minutes. This is hard because your kitchen and remainder of your abode (condo, apartment, house, grass hut) all start to smell fantastic. If you must, perhaps one more taste test will help get you through the next 30 minutes.

Once the looonnnggg 30 minutes has passed, remove from heat and add the seasonings – cayenne, salt and pepper. Also, add in your 3/4 cup of cheese, which will melt into the glorious concoction after a few stirs. Then pour into bowls, on to plates and serve with whatever you’d like. I had mine all by itself with a very tasty beverage. But most want something more for dinner, so if you have a great pork chop or chicken breast – throw these on the plate as a side to the meat. Enjoy the wonderful goodness of grits!