Archive | Appetizers RSS feed for this section

Cake Batter Dip

7 Apr

Holy cake batter heaven Batman! This may be one of the best dips I’ve ever made and I cannot WAIT for you try it! I’ve already memorized the recipe and know that Luke and I will always have this one in our arsenal when we’re having people over.

IMG_4773

Why is this so good?

I don’t know folks, but it just IS:

  1. Do you sneak cookie dough from the bowl as you’re SUPPOSED to be putting the cookies on baking sheets (you know who you are)?
  2. Do you always order cake batter ice cream when it’s an option (guilty)?
  3. Do you love finding an excuse to still eat teddy grahams (I forgot how AMAZING chocolate teddy grahams are friends…a travesty I realize)?
  4. Do you still enjoy finding ways to add sprinkles into things, just because (c’mon, they make everything more fun)?

If you answered yes to ANY of these things…you…must…try…this…dip.

I found this on Pinterest and was challenged by a friend to give this a go, blog about it so she’d know if this was worthy. Friends, it so is. This is worthy.

Thanks so much to Cassie Craves blog for bringing this joyous concoction to our attention! I made a few tweaks to the original recipe, but the basic concoction was from the aforementioned blog. Can’t wait to check out more of her posts!

Enough with the rambling, let’s get right into the thick of it!

Ingredients:

  • 1 package of Pillsbury Funfetti Cake Mix
  • 2 cups of Vanilla Greek Yogurt
  • 1 1/2 cups Whipped Topping
  • 1-2 tsp of Vanilla Extract
  • 2 Tbsp of colorful Sprinkles (plus extra for sprinkling on the top)

For Dipping:

  • Chocolate Teddy Grahams
  • Nilla Wafers
  • Other ideas: flat cookies, fruit, graham crackers

How to Make:

Locate a bowl and your mixer of choice. Then, prepare for some ingredient blending.

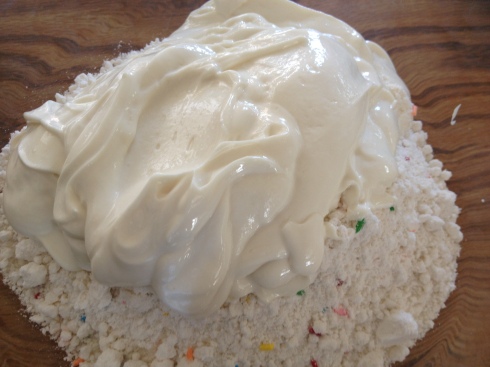
First pour in the Funfetti cake mix…

IMG_4729

…the 2 cups of Greek yogurt…

IMG_4731

…the cup and a half of whipped topping…

IMG_4732

…splash in the vanilla…

IMG_4734

…throw in the sprinkles…

IMG_4735

…and blend baby blend! This whips up nice and quick and the sprinkles create a really fun and colorful look too. Use a spatula to help get the dip off the sides if it starts to creep up. Then, spoon into some Tupperware as you need to pop it in the fridge for about 2 hours (minimum) before you dig in. (You can refrigerate longer too, it just needs a few hours to firm up a bit.)

IMG_4737

That does not mean that you can’t lick the beaters…and the extra spoon you just happened to have used…and the bowl that you used…

Sigh. So delicious.

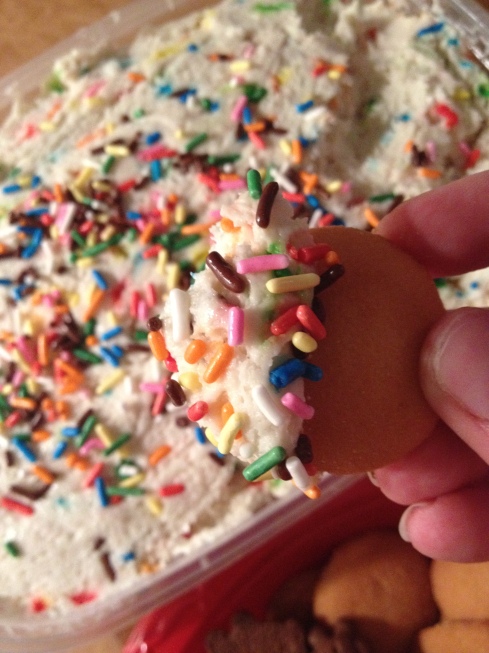
Before you serve, scoop into your serving bowl of choice and have some sweet crispy snacks on hand to use to  dip. We chose Nilla Wafers and Chocolate Teddy Grahams. But plain graham crackers or fruit would work too, just be sure it’s durable so it holds up  as you pile on the goodness, forewarning.

IMG_4772

Make sure to add some sprinkles on top for garnish before you serve it up to all those excitedly lined up with their dipping mechanisms.

IMG_4773

I loved this, those who consumed it also gave it a thumbs up and I really, deeply think you will too.

Let me know what you think when you give this a whirl!!
Spicy Turkey Meatballs

1 Aug

Hola friends. I realize I’ve been a very poor blogger this last month. Boo. Hiss. I know.

But the good news is I have a bunch of wonderful posts to share with you over the next few weeks to make up for the slllooowww posting in July.

Do you forgive me?

I hope so.

To make it up to you, I’m sharing a delectable meatball recipe from one of my favs from the Food Network – the Barefoot Contessa. The woman knows her stuff and you just KNOW her recipes will result in a happy stomach.

Backstory to why I decided to make these babies…a few weekends ago, a bunch of my girlfriends and I were celebrating a very good friend of mine – Andrea – at her bachelorette party. We did a fun-filled cabin weekend with the meals divyed up amongst the group. I volunteered to take on Saturday evening (which meant I was going to do as much prep as possible BEFORE Saturday…c’mon…it was a bachelorette party…prep was needed). The decision was to make it simple and tasty – spaghetti and meatballs, salad and garlic bread. I figured with the spaghetti, garlic bread and salad all needing very little prep (I cheated and bought a few pre-mixed bags from the store. I know what you’re thinking. Lazy. Yes I know. But SMART considering) the meatballs could be the star feature.

I searched through my cookbooks, blogs, magazine clippings. I couldn’t find the right meatball. I was getting frustrated. It was also about 8:00 PM the night before I was to depart for bachelorette party madness and I was recipe less. And grocery item less.

Until Ina.

Thank you Ina.

These are in her “How Easy Is That” cookbook and they’re keepers in my book. I modified her recipe a little bit on purpose and a little bit by accident:

Ingredients:

  • 3 cups (1-inch diced) bread cubes crust removed (I kept the crust on because I felt like it. You can go crustless if you’re into that.)
  • 2/3 cup whole milk (Ina suggest whole milk but I just couldn’t do it and have the rest of the container leftover. I’m not into whole milk. Ish. I went 2%.)
  • 2 pounds ground turkey (85-percent to 92-percent lean <— Ina’s suggestion)
  • 1/2 pound sweet Italian pork sausage (Ina recommends the sweet variety but I couldn’t find it, used normal stuff and it was still delicious.)
  • 4 ounces thinly sliced prosciutto, finely chopped
  • 1 cup freshly grated aged Asiago cheese
  • 1/2 cup minced fresh parsley (I forgot to get this…oopie…so used dried parsley. It worked.)
  • 1 teaspoon dried oregano
  • 1 teaspoon crushed red pepper flakes
  • Kosher salt and freshly ground black pepper
  • 3 tablespoons good olive oil, plus extra for brushing the meatballs
  • 2 extra-large eggs, lightly beaten

How to Make:

Preheat your oven to 400 degrees first. Prep your sheet pans (with either Pam or parchment paper) second. Or reverse that. I won’t tell.

In the mixing process, your first task is to assist your bread into becoming crumbs.

Enter in the FOOD PROCESSOR. The crumb making machine.


Wow.

Now take those lovely crumbs and put them and your milk into a small bowl. You’re going to let those two ingredients sit and become one for about 5 minutes. Sounds weird, but trust in Ina. She’s a smart cookie.

Now, in a different bowl that’s more in the ‘big’ category, time to mix up everything.

First, in goes the pork sausage…

Then the ground turkey…

…prosciutto (probably my favorite ingredient in these balls of meat)…

then the bread/milk concoction (after it set for its 5 minutes of course)…

 …Asiago cheese…

…parsley (fresh if you’re with it when you’re grocery shopping, unlike me)…

…oregano…

…red pepper flakes (the wonderful KICK part of the recipe)…

AND finally…1 tablespoon salt, and 1 1/2 teaspoons pepper.

Admire your lovely mountain of ingredients. Post admiration, mix everything up. I prefer to use my hands for these type of steps (vs. a fork or spatula) because I personally think it gets mixed more thoroughly. You really want the spices to be as evenly mixed as possible too – you’d hate to get one SUPER spicy meatball and one that’s bland. Not cool.

Once you feel like the whole mixture is lightly but thoroughly mixed together, add in the olive oil and the eggs. NOW you can use a fork or spatula to mix those wet ingredients in. Be gentle, but make sure it’s fully mixed. No skimping.

Now, time to make some balls. Ina recommends about 2-inch meatballs. She also suggests you brush the meatballs with olive oil prior to popping them into the oven. I forgot that step. Whoops. BUT you can still have tasty meatballs without it. Trust me!!

Bake these guys for 35 to 40 minutes or, as Ina puts it, “until the tops are browned and the centers are completely cooked.”

Then serve these to a bunch of hungry, sunburned people. At least, that’s what I did.

Pico de Gallo

20 May

This is an extremely easy and tasty recipe to make as an appetizer or snack. I’ve made this many times myself and realized it would a great one to share on the blog.

While visiting my brother Doug and my SIL Laura in Chicago, we had this to munch on while enjoying the blackberry margaritas as we created the remainder of dinner.

If you’re a guacamole person instead of a pico de gallo person, all you have to do is add some avocado and perhaps a little additional lime juice to this pico de gallo and POOF – enter the world’s best guacamole. Ok, maybe it’s not THE best, but it’s pretty darn close.

This is a recipe from my bff – Ree, the Pioneer Woman. That wondrous lady has so many easy and delicious recipes that I make quite a bit. What a genius she is.

Ingredients:

  • 5 whole Roma tomatoes
  • 1/2 of a large white onion
  • 3 whole jalapeño peppers
  • a hearty bunch of cilantro (or for you weirdos out there who think cilantro tastes like soap…you can leave this out. But this MAKES it true pico de gallo. In my opinion. But we don’t want anyone thinking this recipe tastes like soap. So if you’re anti-cilantro…you’re weird…but you can leave it out. And we’ll still like you. Maybe. )
  • Lime Juice (fresh or bottled…whatever is on hand)
  • Salt To Taste

How to Make:

Depending on the ratio you’d like of tomatoes to onions, you can play around with how much you’d really like to use. We made slightly less than the full recipe version Ree created with the ingredient quantities above…with three tomatoes, just under 1/2 of the onion (I like onion, what can I say) and one big and one small jalapeño.

But the best part of this recipe is, all you must do is dice. Dice your little heart out. Well, don’t dice the lime juice or salt, but everything else. Once your dicing is complete, toss everything together in your serving bowl of choice. Sprinkle in the amount of lime juice that you’d like and the same with the salt.

Find some thick and delicious tortilla chips to dip – we used a really thick corn variety from a local Chicago spot. It was perfectly salty and a great compliment to the spice, lime and salt in the pico.

If you need something a little salty, with a good amount of veggies and want something most everyone will dig into and devour quickly – this is the perfect dish.

Grab a chip and dig in!

Baked Brie

17 Mar

Are you in need of something simple, tasty and quick to make? It doesn’t matter if you’re hosting a party, eating with your family or like me – enjoying a Saturday afternoon by yourself. I made this last weekend before I started packing for my Mexico trip. It was the perfect treat and one I had been waiting to make ever since I bought the makings at the grocery store. It’s – Baked Brie!

The back-story to this – I visited a good friend of mine, Marissa, in Memphis, TN a few weekends ago. She and her significant other were hosting a party at their house one evening and she whipped up this recipe as one of the snacks. It was delicious! I couldn’t believe I’d never made it before. When I returned home, I knew it was on the list of things to make. SOON.

Baked brie has many variations. I knew I wanted to use puff pastry, a mouth-watering rhubarb-berry jam and brie cheese. I wasn’t sure what other ingredients were needed/wanted in the recipe. I googled baked brie to see what came up and ended up with this recipe from Simply Recipes. I made some variations with ingredients which can be seen below:

Baked Brie:

Ingredients:

  • 1 large sheet of puff pastry dough (Remove it from the freezer 40 minutes before you plan to use it and it’ll be perfectly thawed.)
  • 1 wedge of Brie cheese – do not remove rind (I used a strong French brie, which turns out I didn’t enjoy as much as mild brie. Find the type of Brie you’d like best and use that.)
  • Any sweet jam you can find and think sounds tasty (I used rhubarb-berry jam but any kind will work. Experiment!)
  • Brown sugar to sprinkle
  • Maple syrup to drizzle (The recipe calls for 1/4 cup, but I preferred to drizzle it on top which probably totaled only 2 Tbsp. You can do as much as or little as your sweet tooth desires.)

How to Make:

Preheat your oven to 350. If you haven’t already started thawing your puff pastry – get on that! It takes about 40 minutes, depending on the brand you use.

Once the puff pastry is ready to go, lay it out on a flat surface. Place the wedge of Brie (with the rind on!) smack dab in the middle. Spread on your jam as thick or thin as you’d like. I layered on a lot of jam. I like jam. You may not. You could even try a few flavors, perhaps mixing different types. Experiment. Come up with whatever makes your mouth water!

After you have the amount of jam on top you’re happy with, wrap up the jam-soaked Brie with the puff pastry. I didn’t make mine very pretty, but perhaps you’re more skilled. As long as it’s all folded in and the edges are pinched together, you should be good to go. But if you’re hosting a big group of people at party and you want it to be prettier – please feel free to do so.

Now you’re ready to drizzle and sprinkle! Drizzle the maple syrup on top – as much or little as you’d like. Follow that with sprinkling brown sugar. I had quite a few clumps of brown sugar and I thought it’d be fun to sprinkle a few of those on the top as well. Sprinkle away until you’re satisfied.

Pop the whole concoction onto a sprayed cookie sheet and bake it for 25-30 minutes. You know you’re done when the top of the pastry starts to turn a little brown. Let it cool at least 10 minutes or so before you dig in.

I ate mine with honey crisp apple slices, but crackers, stiff bread or other firm fruit would also work.

Enjoy!!!