Archive | Desserts RSS feed for this section

Fruity Dark Chocolate Bark

19 Jan

IMG_4160

Happy Sunday! Although Sundays may not be my absolute favorite day of the week, there is usually an opportunity to do some baking/cooking to end the weekend. Hard to complain about that!

I was in the mood to try something new and different today, something not too dramatically unhealthy but yet, still sweet enough to satisfy a mini dessert craving.

I opened up my Pinterest board of Treats to see what leaped out at me. The cakes and pies I’ve posted in recent months were drool-worthy but not quite what I was looking for. Cookies weren’t really grabbing me. Then I saw this pin from “Love & Olive Oil” and was SOLD for the following reasons:

1) Dark chocolate gets an A+++ in my world (don’t A triple +’s exist in your world?!?!) and is by FAR my favorite type of chocolate.

2) Freeze dried fruit isn’t something I normally bake with so it would be a fun, new adventure.

3) The result wouldn’t be outrageous in unhealthiness.

4) This is VERY easy to make and doesn’t require a long list of ingredients.

Convinced this is a perfect Sunday night treat?! Good!

Thanks to Love & Olive Oil for the wonderful recipe! Looking forward to trying more on that blog…

Ingredients:

  • 8 – 11 oz of dark chocolate, using a good brand if you can (aim for 70-80%)
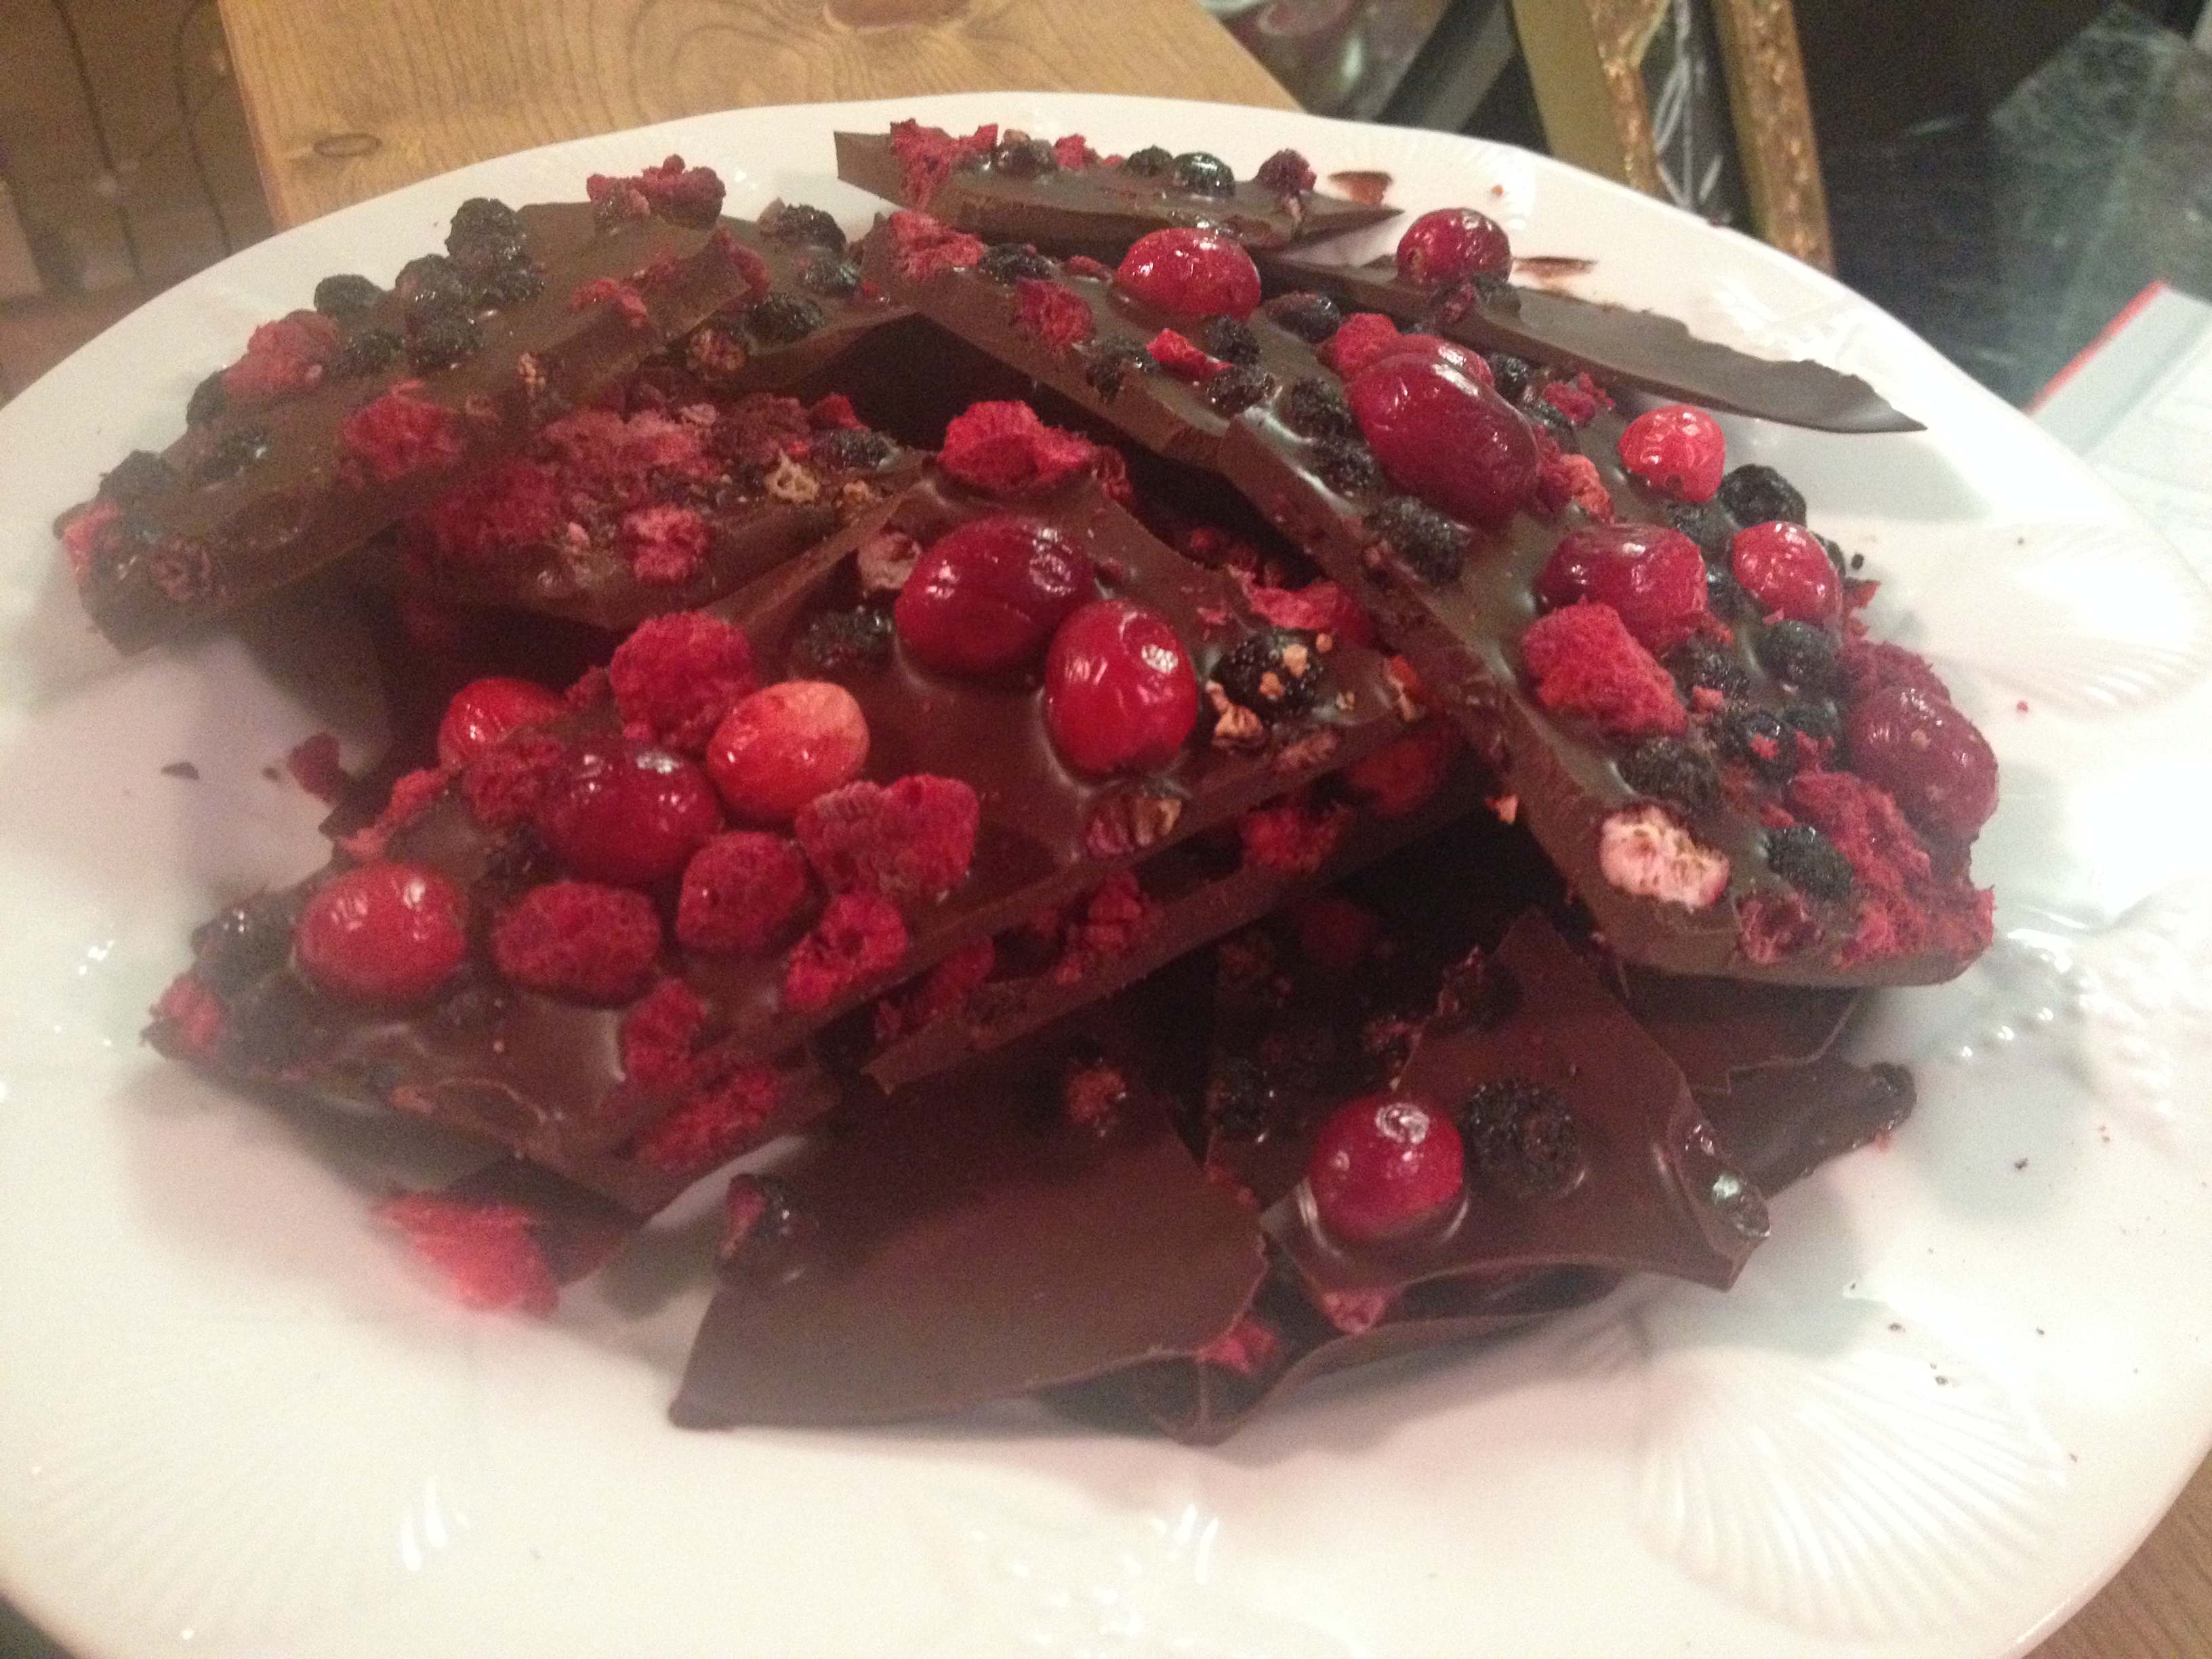
  • 1 cup of your choice of freeze-dried fruit (you can also do a mix like I did – raspberries, blueberries and cranberries)

*Note: I was completely unaware of where freeze-dried fruit would be in a grocery store. I asked a few perplexed folks at my local grocery store and was unsuccessful at that spot. However, I Googled and Trader Joe’s has LOTS of freeze-dried fruit! I recommend looking there if your usual grocery store doesn’t carry any freeze-dried fruit.

How to Make:

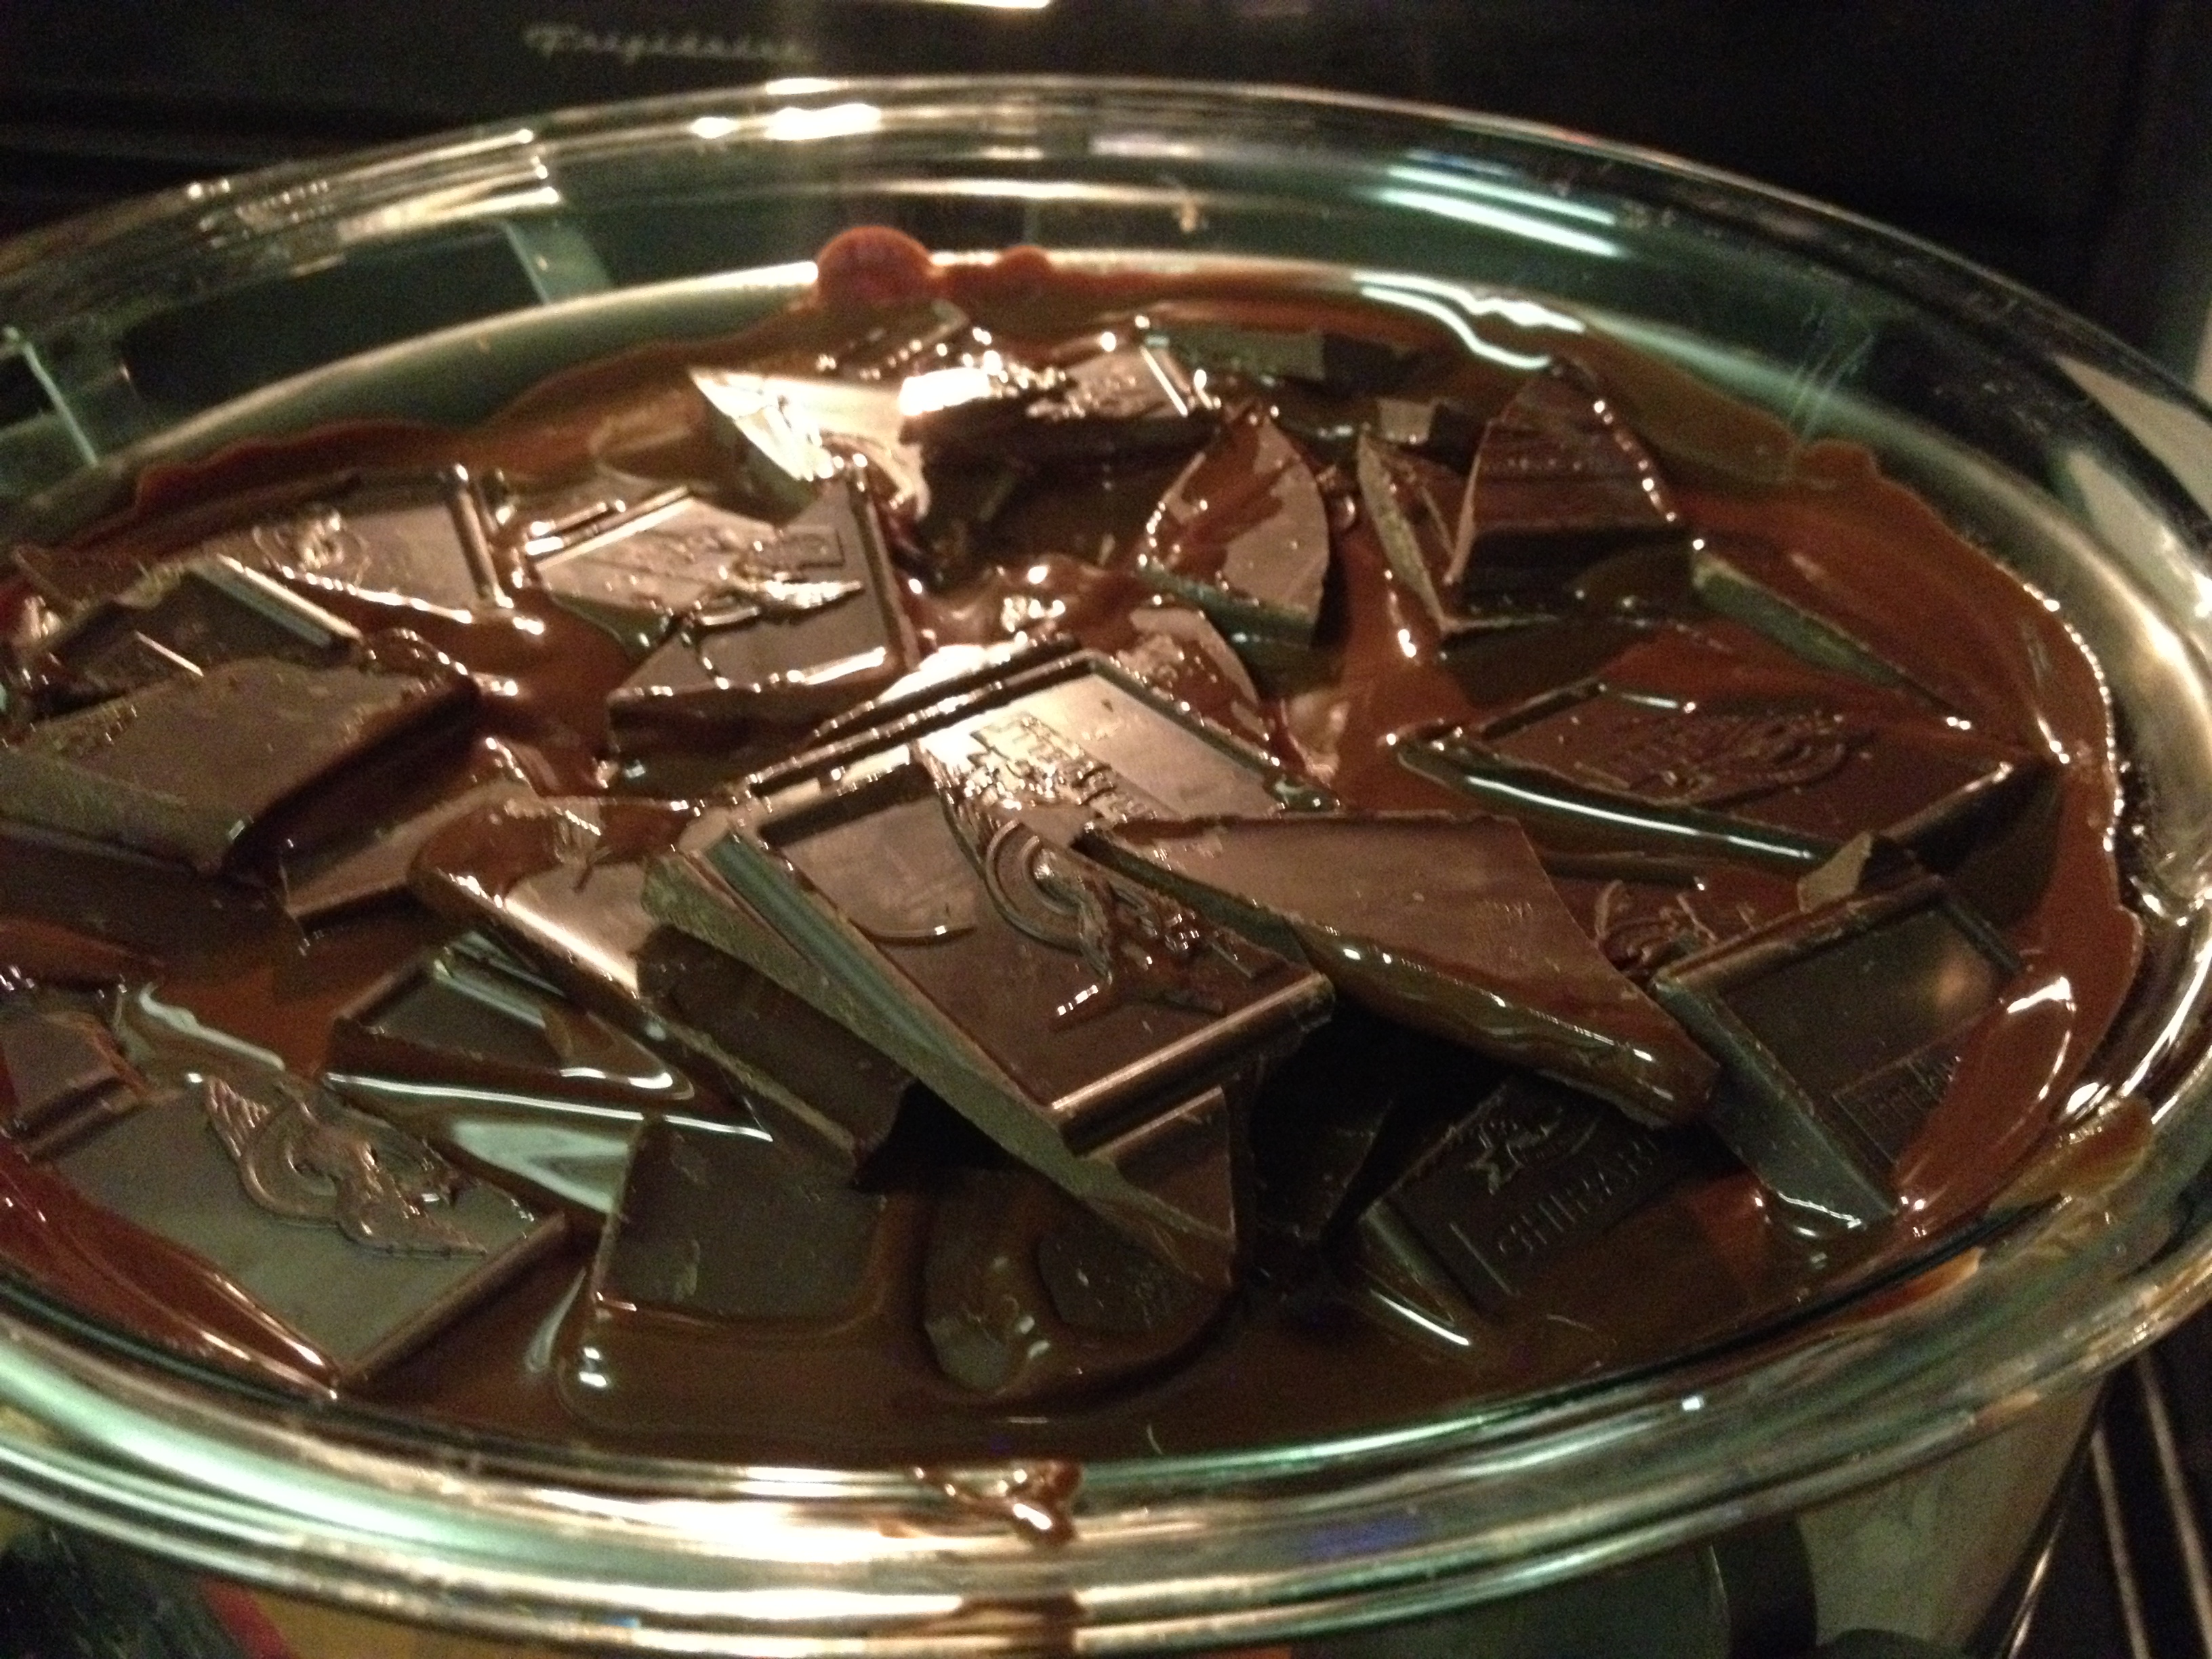
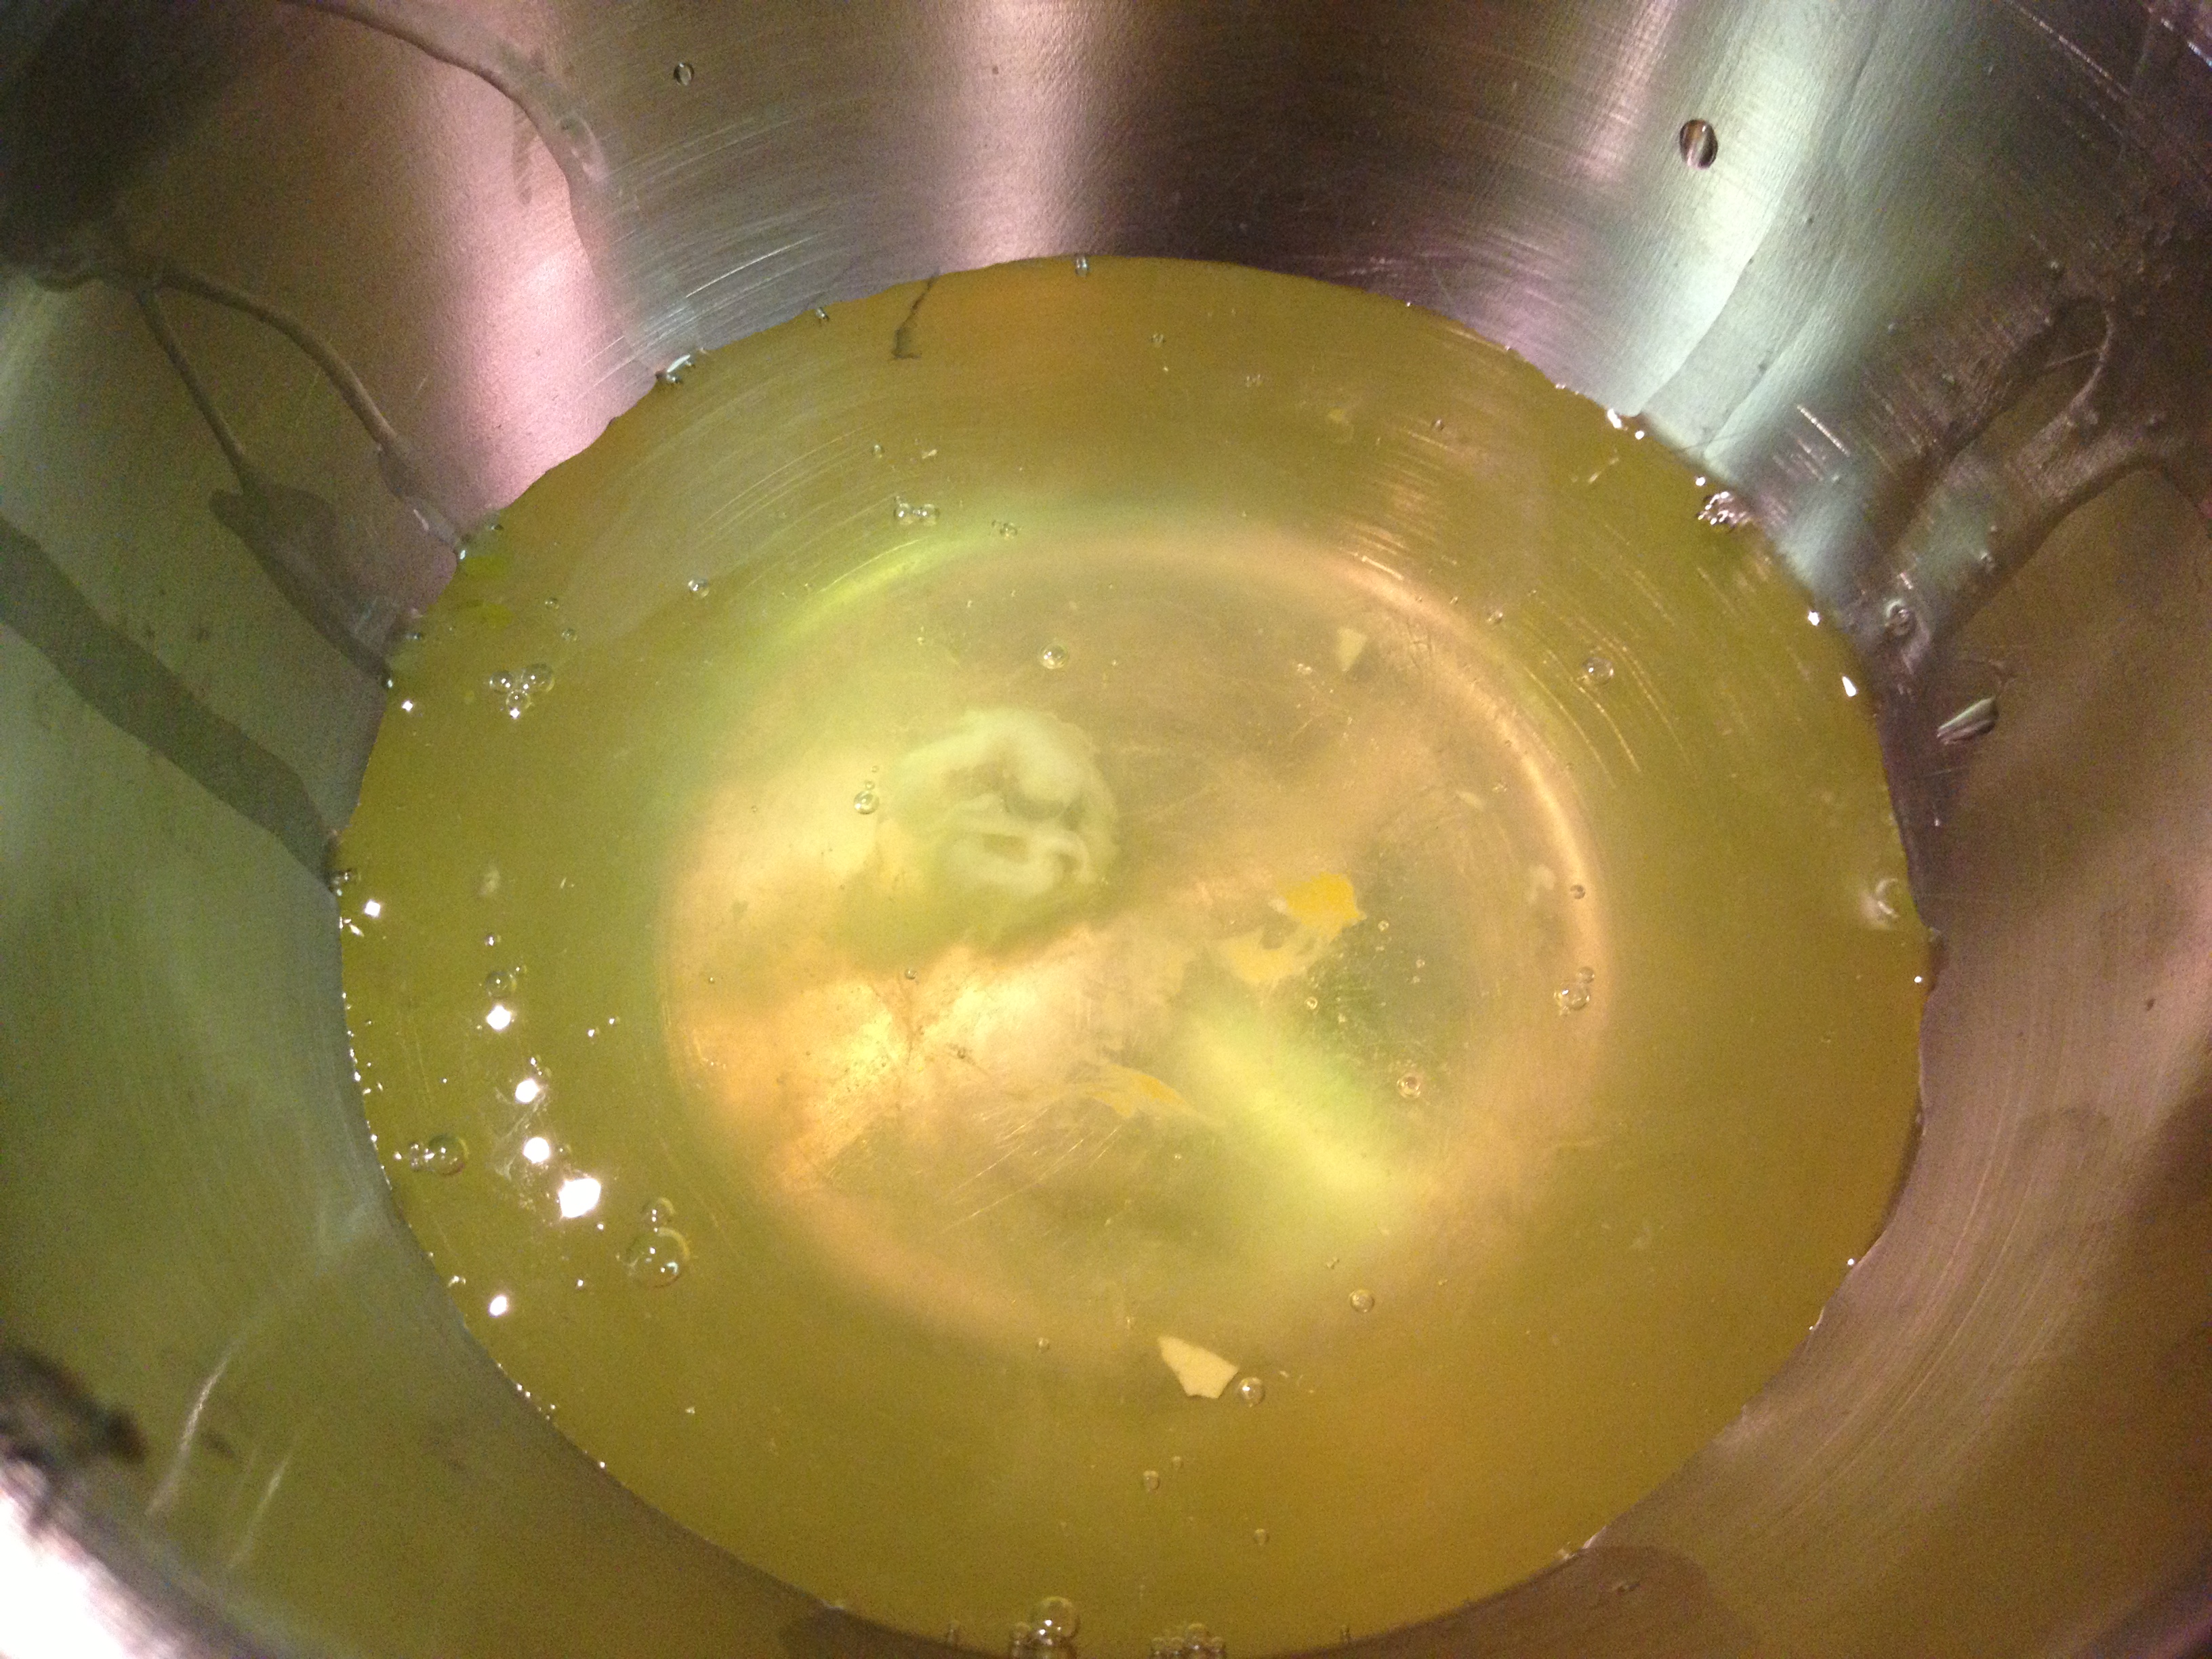
To get things started, you’ll need to melt down the chocolate. I went with Ghirardelli’s ‘Intense Dark’ chocolate bars for my bark. As they came in bars of 3.5 oz bars, I rounded up to get 3 bars for a total of 10.5 oz. The original recipe only calls for 8 oz, but I figured having more chocolate was the way to go. Obviously.

IMG_4136

You can finely chop this before melting if you so choose. I went with the broken chunks method over a double boiler. But mircowaving works just as well if you’re in a hurry. Regardless of method, be sure to stop regularly and stir.

IMG_4137

IMG_4140

This also gives an excellent excuse to lick your spoon/spatula when it’s all said and done.

IMG_4141

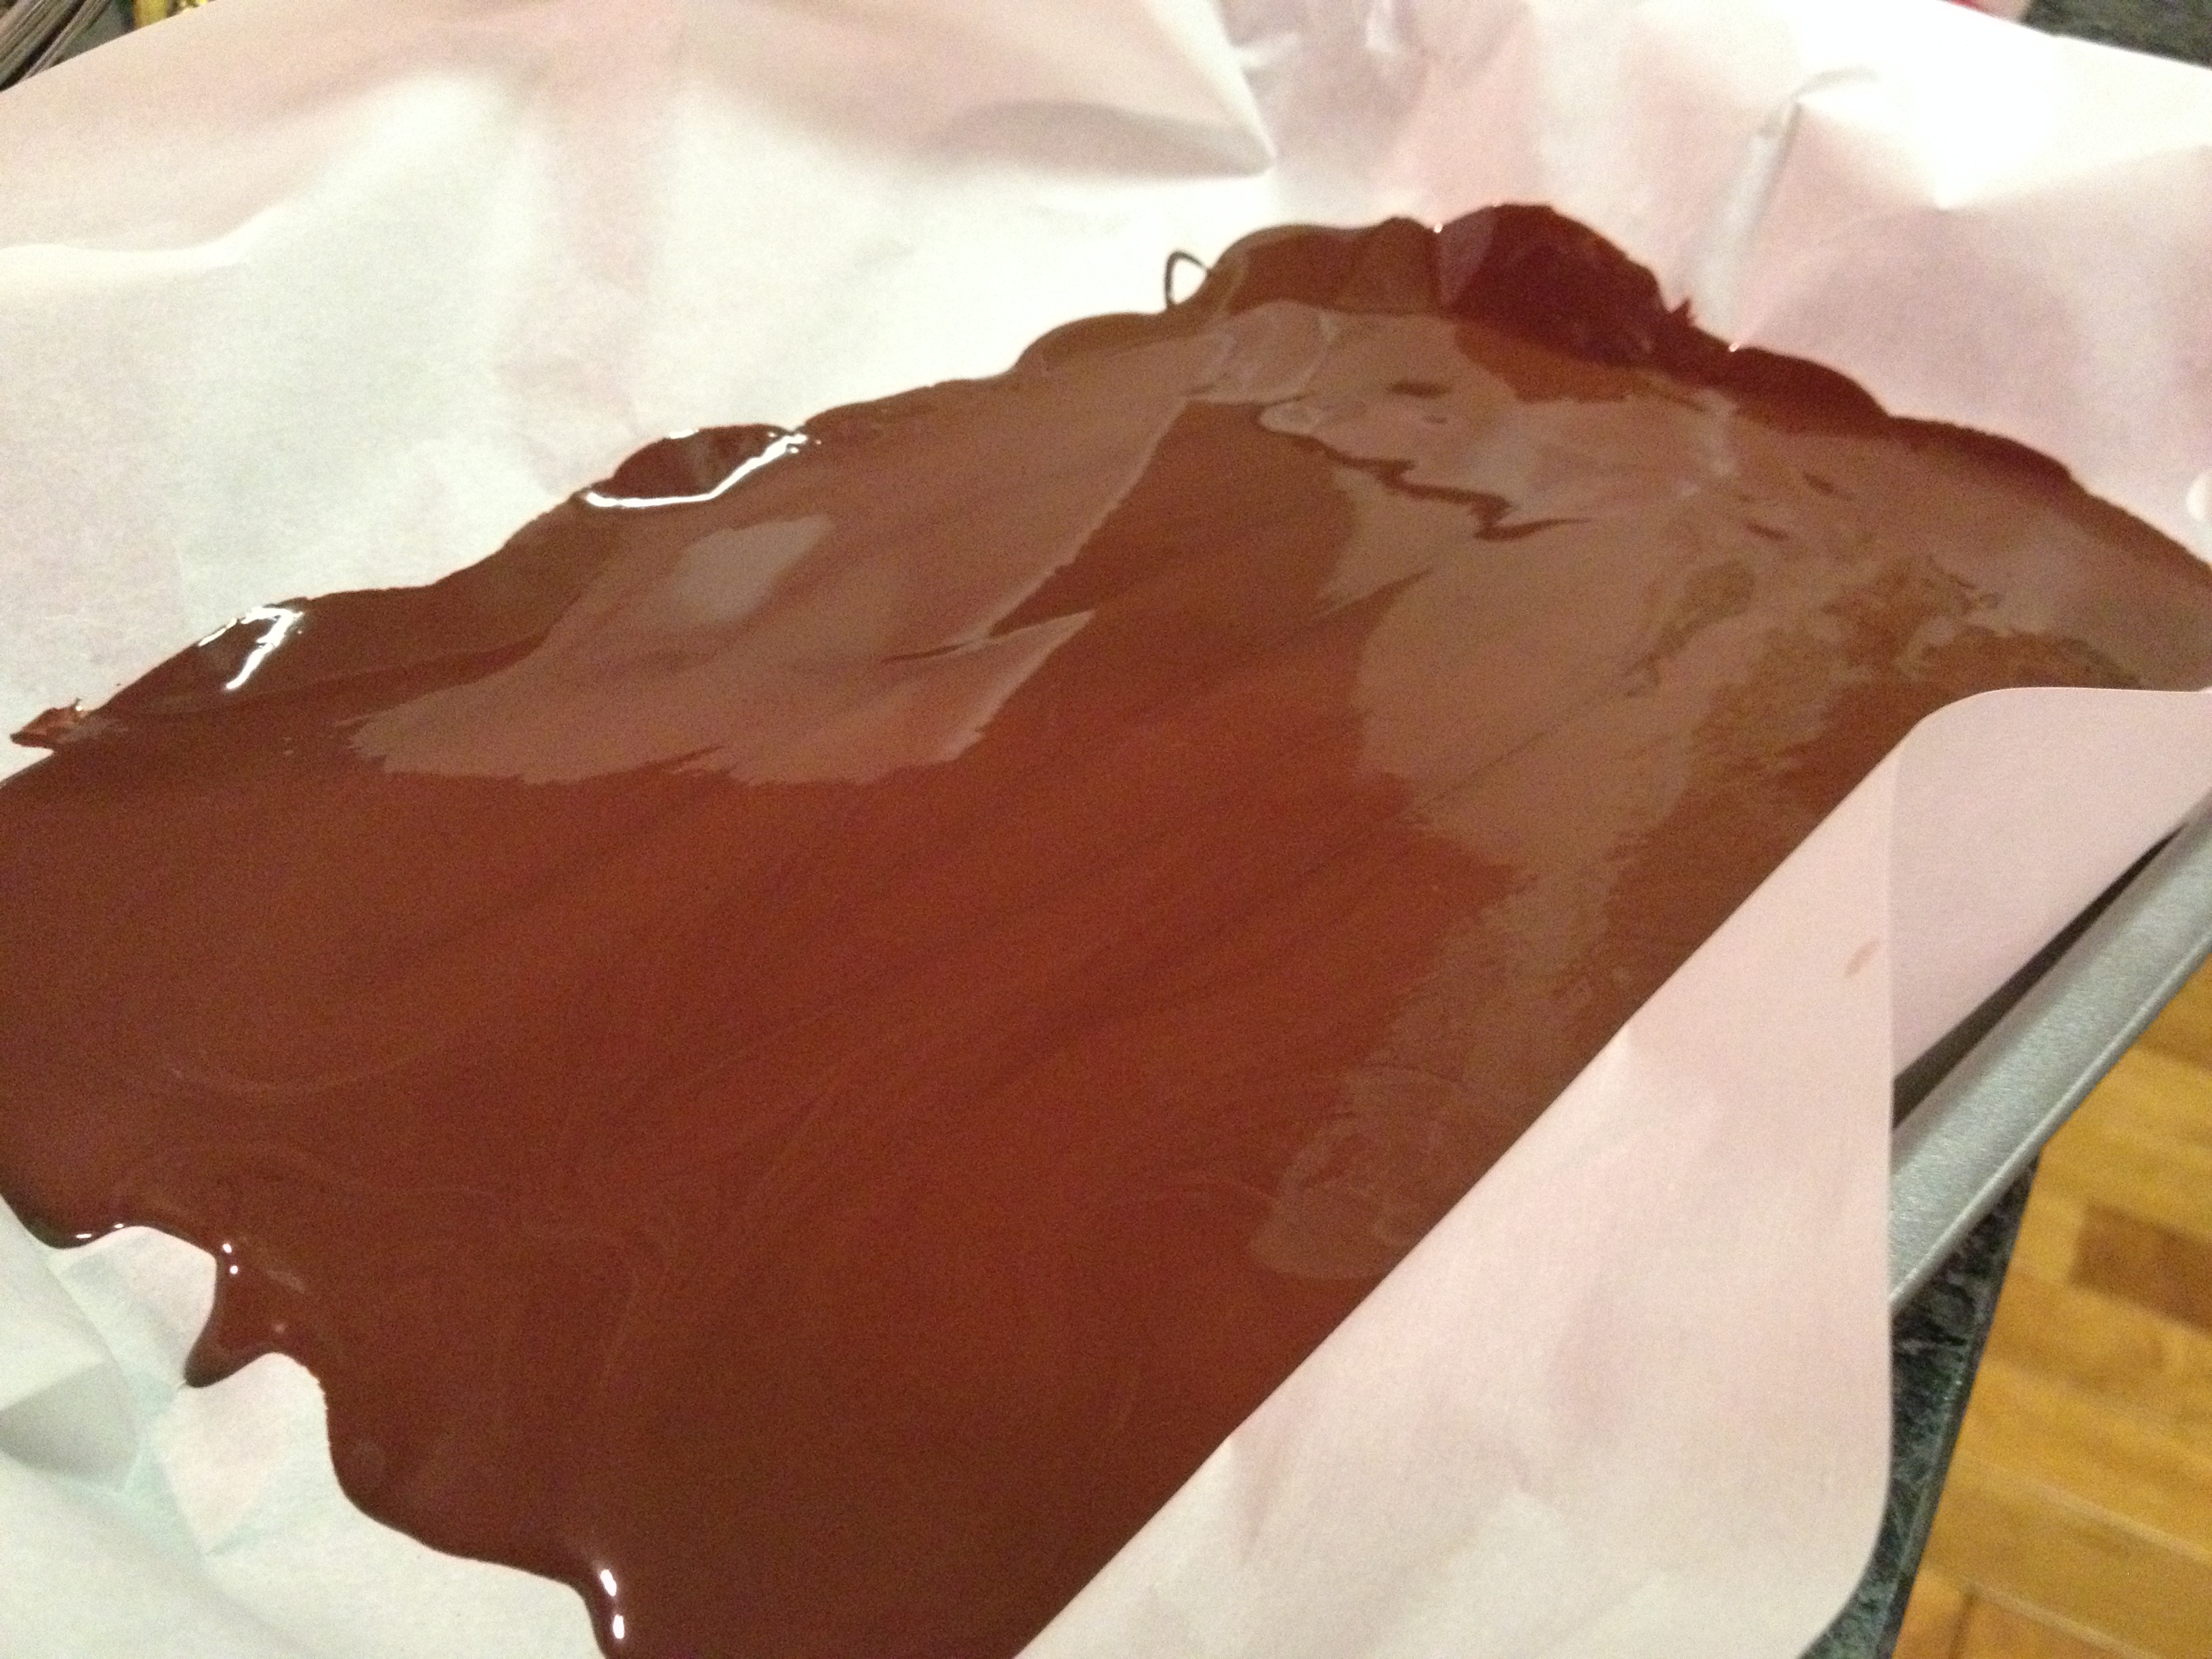
Once all melted, pour the chocolate out on to parchment paper that’s been laid in a 9×13 pan. It will dry quicker if you evenly spread the chocolate out. I didn’t execute this as well as I hoped, but perhaps you’ll do better than I.

IMG_4147

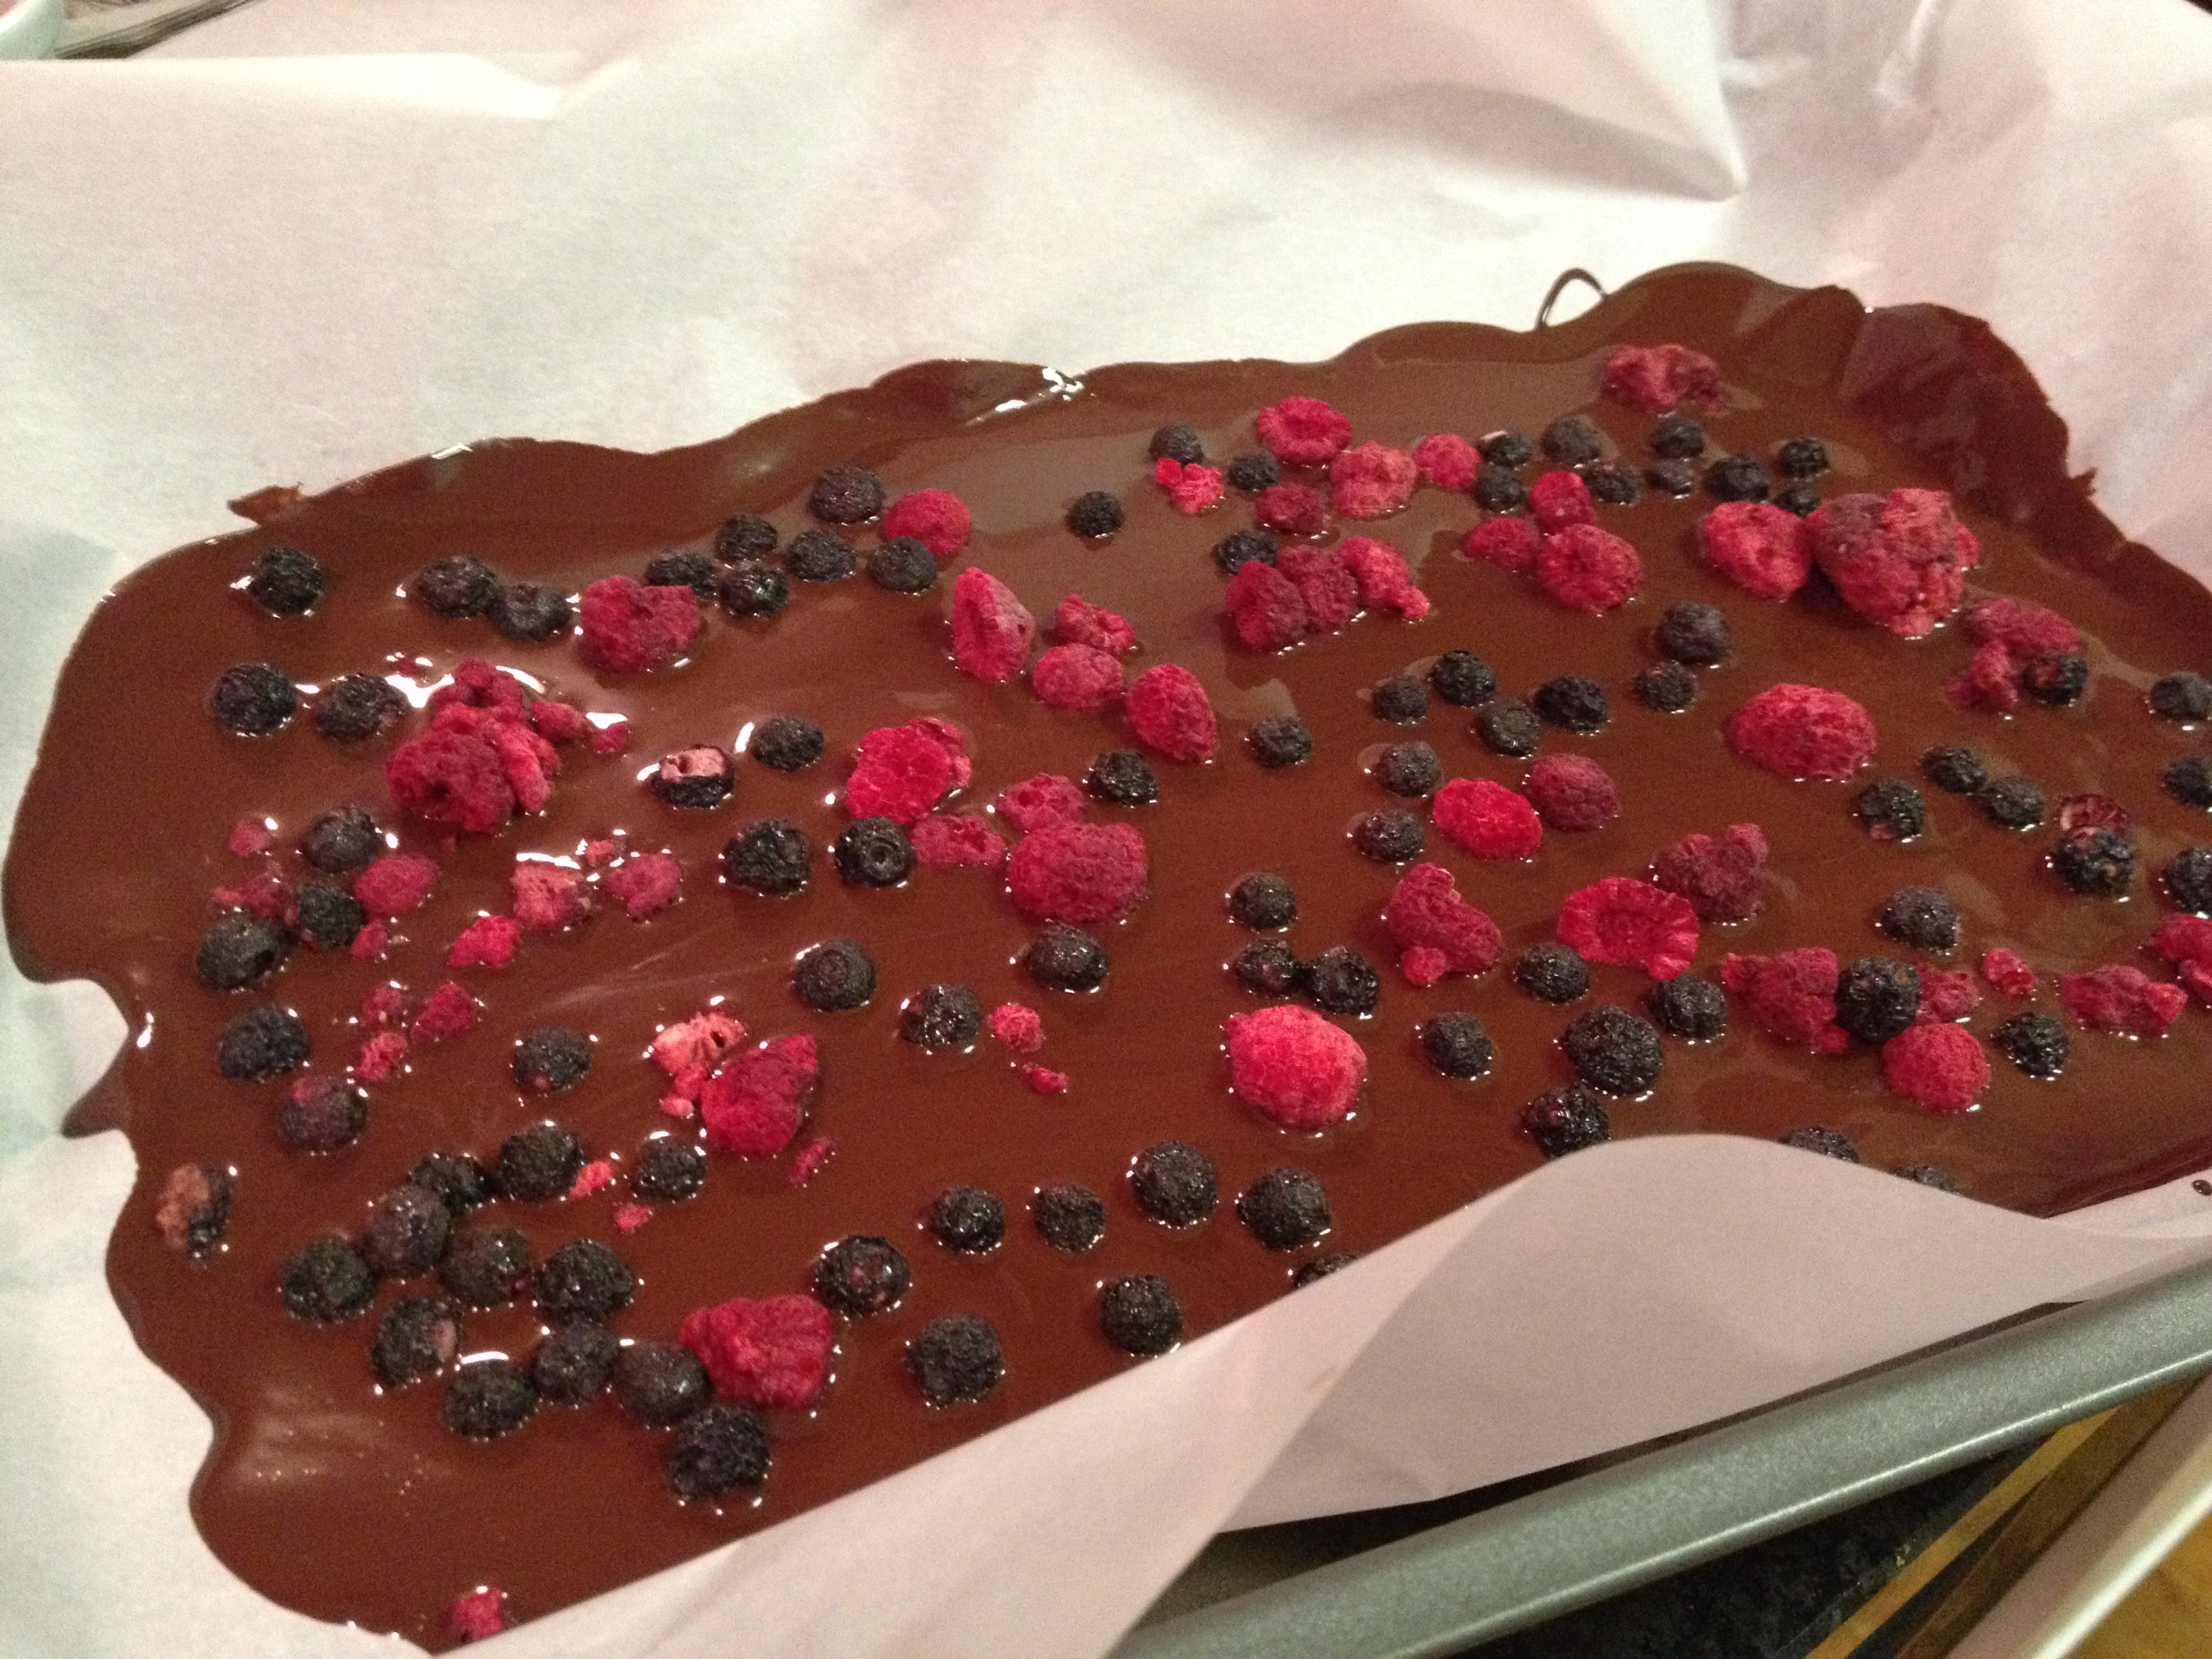
Now, measure out your freeze-dried fruit. I bought 3 varieties so did 1/3 cup of each freeze-dried raspberries, blueberries and cranberries. But any freeze-dried fruit will work!

IMG_4146

Sprinkle your freeze-dried fruit of choice all over the chocolate. If you’re feeling extra bold, you could also try almonds or other nuts and perhaps sea salt? I may give both of those ingredients a go in my next batch of this!

IMG_4148

IMG_4149

IMG_4151

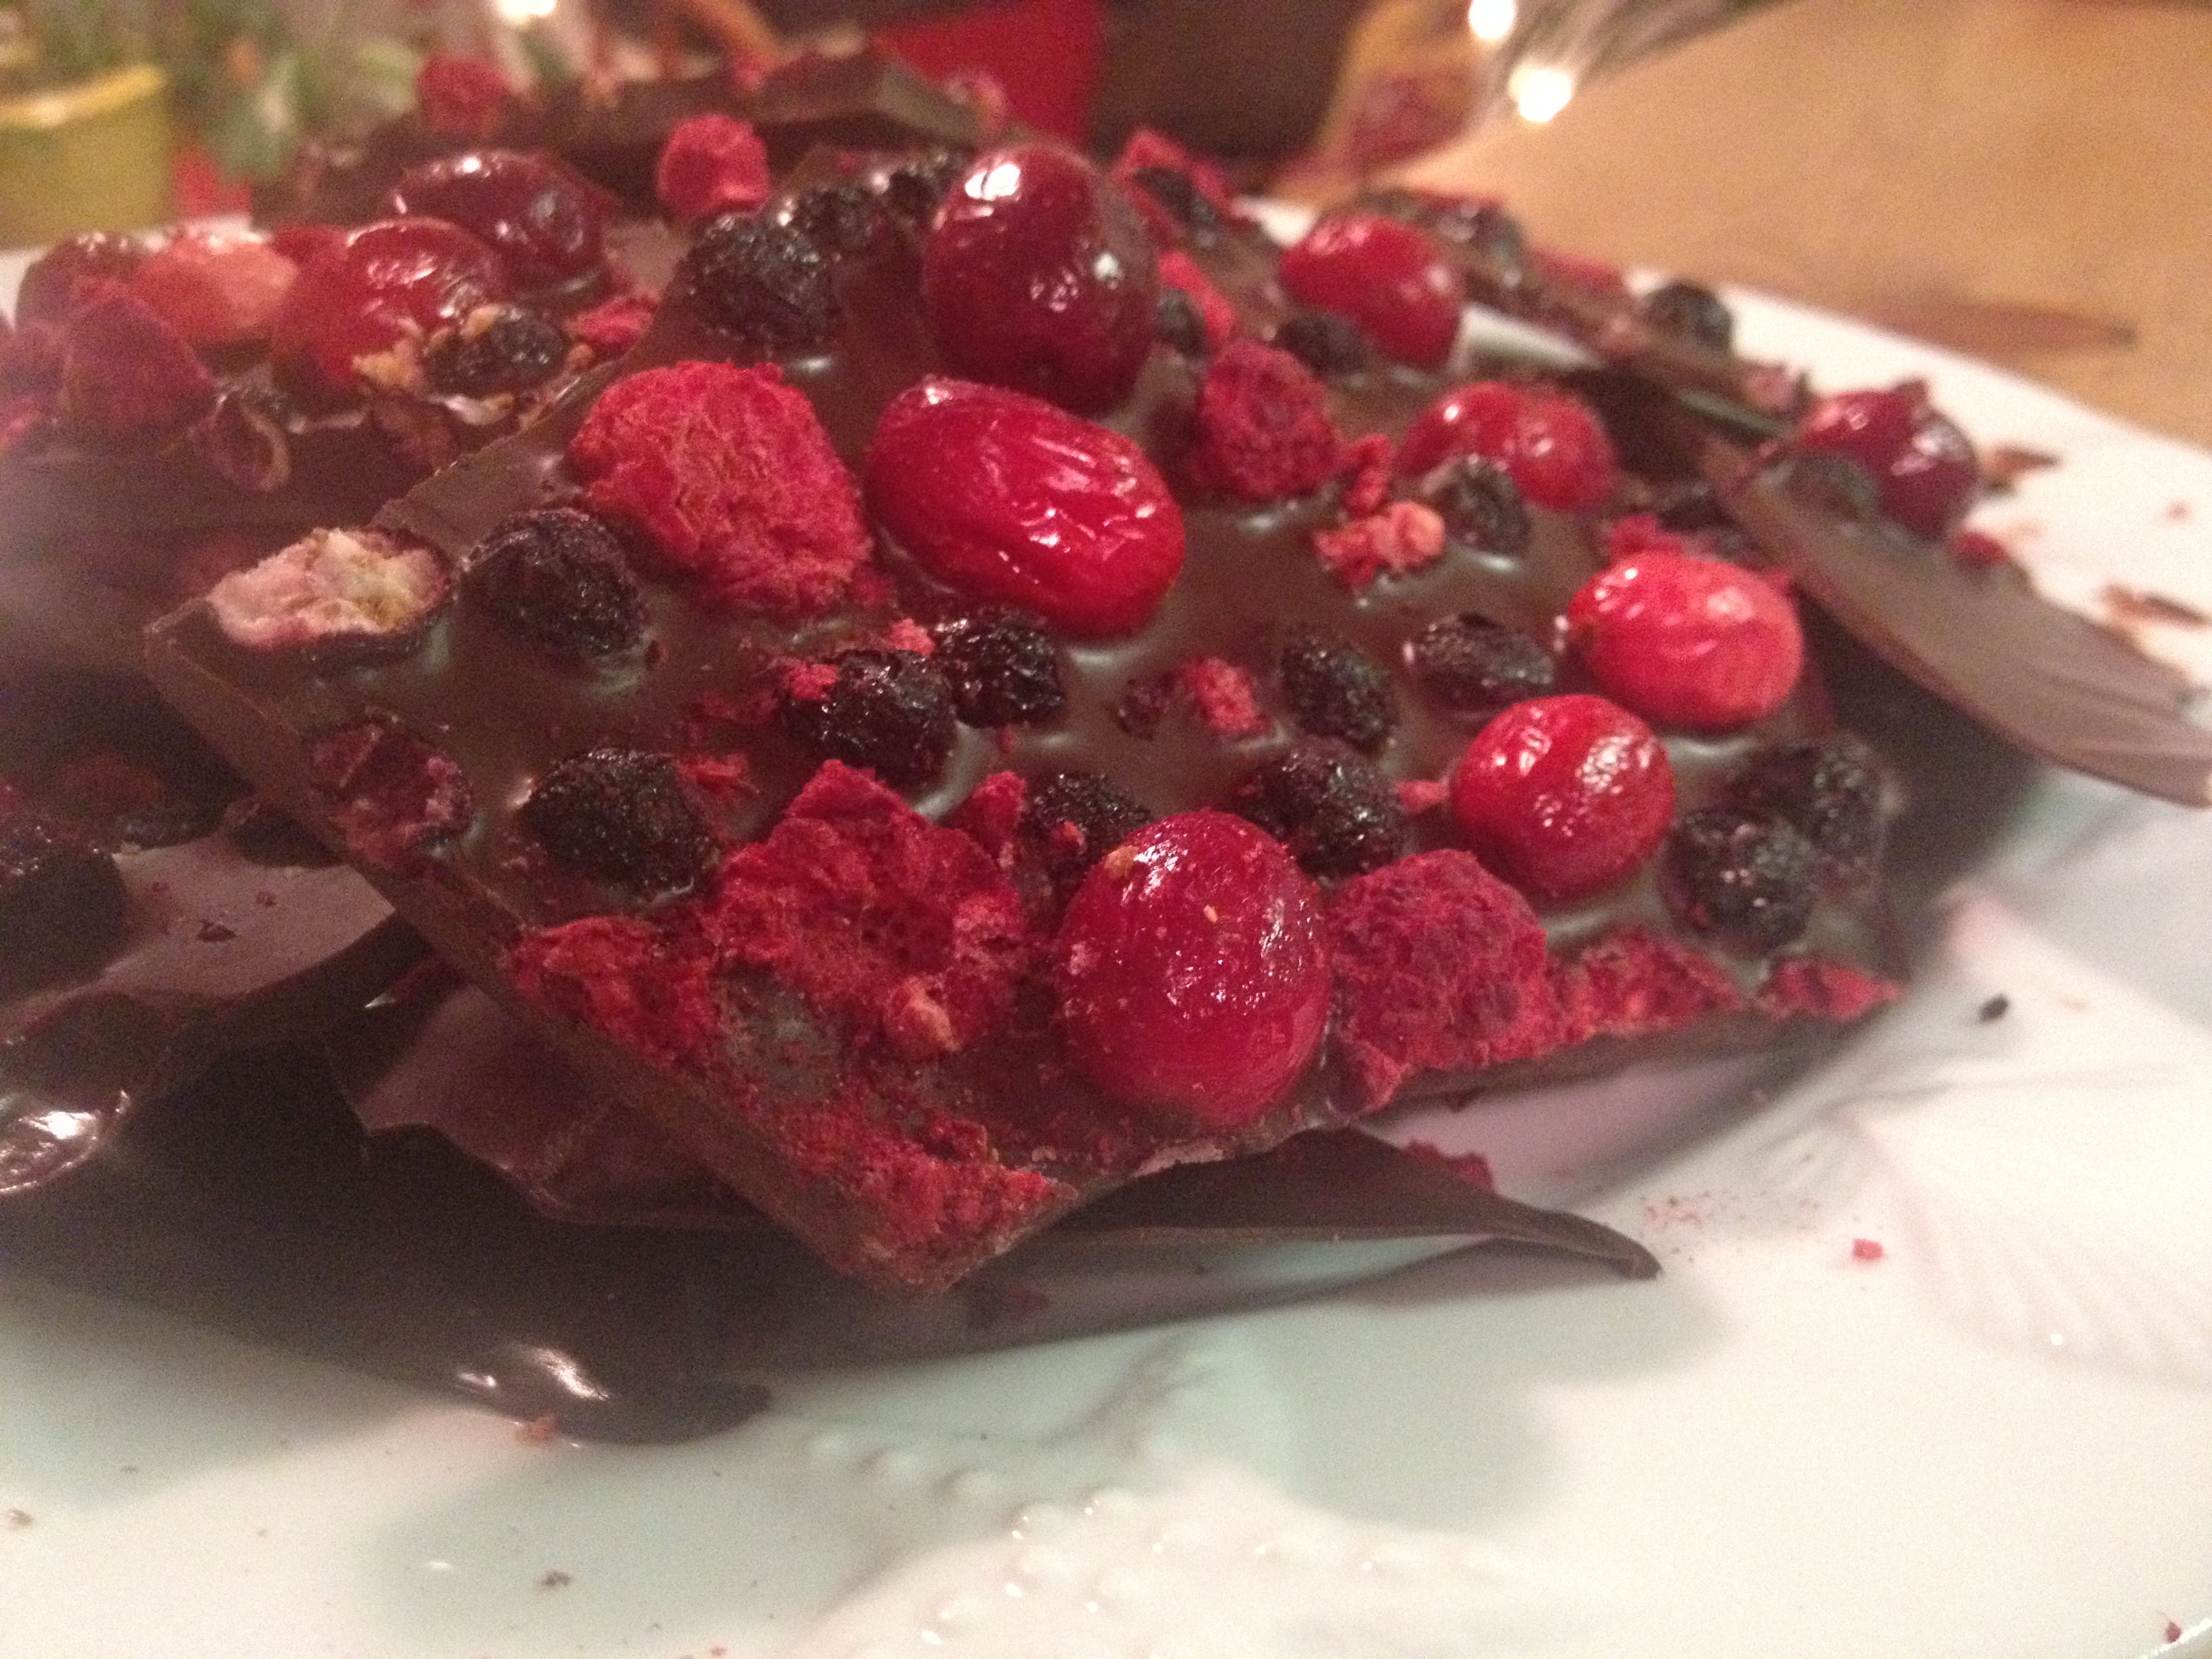
Gorgeous looking, right?!

Now, this needs 1-2 hours to dry at room temperature. However, I recommend popping the pan into the freezer if you’re noticing the bark is taking a bit long to dry. My apartment tends to be a little on the warm side so after 2 hours and still no hardened bark…into the freezer the pan went. 20 minutes later, it was all hardened up!

IMG_4152
Break into pieces and put out for consumption! I bet these will disappear quickly so perhaps make a double or triple batch if feeding a party of people. Or watch them fight it out…could be entertaining…

IMG_4157


I recommend keeping this stored in the fridge just so it doesn’t start to melt down. It’s supposed to last only about a week, but I truly doubt it will even last that long as it’s just so very tasty.

IMG_4159

Enjoy!


Advertisement

Chocolate Muffins (with a Healthy Spin)

4 Aug

IMG_3254

A few facts to preface this post. Fact #1: I thoroughly enjoy chocolate. Fact #2: I thoroughly enjoy muffins, cakes, cookies etc. However, maybe like some of you, Fact #3, my metabolism no longer allows me to consume these items as much as I’d like without some consequences. Which…is unfortunate.

Thus – I was on Pinterest one day trying to find some healthier (note not healthy…health-IER) recipes and found this little gem. There’s no flour involved – there’s applesauce and plain greek yogurt that help to keep the muffins together AND keep them moist. I was intrigued enough to give these a try.

Also, Fact #4 – my boyfriend Luke has quite an affinity for baked goods that come from my kitchen. So like most treats I make, the plan was to make a big batch, have a few myself and then feed the rest to Luke. Muah hahaha.

(He has yet to complain so I think it’s a win-win situation for both of us.)

Thus, another episode of Thursday evening baking happened this last week and the resulting muffins were quite delicious. I highly recommend!

I will say I changed up the recipe a bit because of the ingredients I had available. I’ve linked to the recipe I based these off of (and the blog post about that recipe links to the original recipe too) above for those who want to try the full-on healthier version or you can follow what I used below. I trust both will work out nicely for you. And regardless, you end up with chocolate muffins. 🙂

Recipe makes about 24 small muffins or 12 larger muffins.

Ingredients:

  • 1 3/4 cup of oats
  • 3 egg whites
  • 3/4 cup cocoa powder (the recipe calls for unsweetened cocoa but I had cocoa powder on hand so that’s what I used)
  • 1/2 cup applesauce (the recipe calls for unsweetened but I used normal applesauce and they still turned out wonderfully)
  • 1 tsp vanilla extract
  • 1/2 cup plain Greek yogurt
  • 1/2 tsp cream of tartar (or 1-1/2 Tbsp. vinegar)
  • 1-1/2 tsp baking powder
  • 1-1/2 tsp baking soda
  • 1/4 tsp salt
  • 1 cup hot water
  • 1 cup sugar (the recipe calls for a healthy substitute like I cup of Splenda granular OR 1/4 cup + 2 Tbsp stevia but I had none of these options so plain white sugar it was for me)
  • 1/2 cup dark chocolate chips (or whatever other type of chips you’d like!) and an extra 1/4 cup for the muffin tops

How to Make:

Preheat your oven to 350 degrees and grab a blender (or a food processor) as you’ll need no mixer or beaters to clean in this recipe. I know, I know…I was puzzled by this too. But trust me – it works!

Now – if you want smaller muffins for a crowd, this makes 24 muffins (thus you’ll need 2 muffin pans). If you want larger muffins for a smaller crew (1 pan) this makes 12 muffins. I did line my muffin tins but this recipe has a tendency to stick a bit. If you’d these to appear aesthetically pleasing with wrappers off (for any reason) you may want to simply spray the pans with a little Pam. Otherwise, I’m sure those you feed these to will not mind a bit licking of crumbs from the wrapper. I doubt they’ll mind.

Now prepare for this next part…you’re going to mix…

…everything. Ok, not the chocolate chips quite yet, but everything else goes right into the blender.

Yup, you read that right. Everything. Into. The. Blender.

Here we go…

In go the oats…
IMG_3233

…then the egg whites…

IMG_3234

…and applesauce…(note my oat measuring was exceptionally neat and tidy)

IMG_3236

…and then the cocoa (I wasn’t worried that mine was a bit clumpy as the blender would be blending it all together anyway)…

IMG_3237

…and vanilla…

IMG_3238

…and the plain Greek yogurt…

IMG_3239

…and the cream of tartar…and baking powder…and baking soda…

IMG_3241

…and the salt (which I plain forgot to take a photo of, but believe me when I say…it’s in there!)…

IMG_3242

…and the cup of hot water (which causes this fun, little effect)…

IMG_3243

…and then finally, the sugar or your sugar substitute.

IMG_3244

Now blend that concoction until the mixture is smooth (not chunky on the bottom but the same consistency all the way through). I was a bit concerned as the batter seemed to be a bit thin at first. But keep blending until the oats, applesauce and yogurt are consistently blended and that will really help to thicken it up. Trust me!

Now pour into a medium-sized bowl and stir in the 1/2 cup of dark chocolate chips.

IMG_3245

IMG_3246

Then, time to pour into the pans. (I was a wee bit messy at this part so if you have the same problem, just dab the batter spots off the pan with a paper towel. No biggie!)

IMG_3247

Now the muffins get baked for 10 minutes. Then, pull them out…

IMG_3248

…and drop a few of the chips on the top of each muffin. Add as many as you’d like! Most of mine had about 3-6 chips as dark chocolate chips are bit bigger than the normal chocolate chip.

IMG_3250

Now pop these guys back into the oven for an additional 3-6 minutes, or until a toothpick comes out clean. (I had to pop mine back in for about 8 additional minutes as they were still wet when I tested with a toothpick at 6 minutes. So watch these carefully and don’t worry if they take more than 3-6 minutes. It shouldn’t be TOO much more oven time.)

IMG_3251

Once the toothpick comes out clean from a the center of a few muffins, let them cool for a few minutes in the pan. Then place the muffins on a cooling rack or a cutting board to cool completely.

IMG_3252

IMG_3253

I will share – these are delicious eaten while they’re still warm for the obvious melty-chocolate reason. But they’re also delectable eaten once fully cooled. I let them sit out to cool for a few hours and then kept them stored in Tupperware, separated into layers with some assistance from parchment paper.

IMG_3259

IMG_3260

Feed these to your family, your friends, your significant other or spouse or maybe yourself for a snack. (I had a few snacks the night I made these…couldn’t…help…myself.) They’ll disappear REAL fast…

IMG_3255

IMG_3256

IMG_3257


IMG_3258

Give these a try and let me know if they turn out as delicious for you as they did for me!

IMG_3254

Happy baking!

Chewy Sugar Cookies

14 Oct

I’m back with a post that I hope you take seriously. Sugar cookies people, they must be taken seriously.

This is my theory – there’s not anyone out there who doesn’t enjoy sugar cookies. (If you know of anyone, don’t tell me. I’d like to keep the fantasy alive.)

I mean, there are folks who aren’t so into peanut butter cookies (what?)…or those bizarre people who don’t like mint cookies (still don’t get that one) and then people claim you need to be ‘in the mood’ for a good gingersnap (who are these people?). But seriously – aren’t you always in the mood for a sugar cookie?

Scenario #1 – You had the worst day, one of those days where you’d like to just bang your head on a wall. Solution = sugar cookie.

Scenario #2 – You had the BEST day right down to hitting all the green lights both to AND from work. Boom. Sugar cookie.

Scenario #3 – You are nervous as all get-out because you have a job interview/olympic triathlon/big date/final exam etc. the next day. Heeeelllloooo….sugar cookie.

Scenario #4 – You want to bake something delectable but don’t want to spend the whole DAY in the kitchen. Enter….sugar cookies.

Scenario #5 – You want any excuse possible to not do what you know you should be doing (i.e. laundry…unpacking…laundry…loading the dishwasher…taking out the trash…laundry)…consume a sugar cookie

Ok, ok, you get my point. I believe sugar cookies fit every mood, any type of day you had and always seem to hit the spot whether you have a real sweet tooth or not. They’re just a magical cookie.

Now, sugar cookies are fun because you use cookie cutters and frosting etc. BUT, sometimes you may not have the time for the whole roll-out the dough/cookie cutter scenario. THIS is the recipe for you in that particular circumstance. This version (thanks to my favorite magazine Real Simple) of sugar cookies is quick, simple and results in cookies that are as tasty as they look. I DO want to share a roll-out dough/make fun shapes/decorate type of sugar cookie with you at some point on the blog. But that post is not this one.

These cookies I made for a Iowa State University (GO CLONES!) tailgate. Both of my parents and my younger brother are Cyclones, so we were down enjoying a tailgate in Ames, IA and these were the perfect addition to the spread that day. (That’s the reason for the cardinal red and gold frosting colors.)

You in the mood for a sugar cookie?! (Obviously rhetorical due to the argument above.)

Ingredients:

  • 2 1/2  cups  whole wheat flour (I used whole wheat, but you can use all-purpose if you’d prefer)
  • 1 1/2  teaspoons  baking powder
  • 1/2  teaspoon  kosher salt
  • 1  cup  (yes, that’s 2 sticks) unsalted butter, at room temperature (I’ve explained why room temp butter is necessary in past posts, just trust me. Your beaters/mixer will thank you.)
  • 2  cups  sugar
  • 2  large eggs
  • 1  teaspoon vanilla extract (the good stuff, if you have it!)

Glaze Frosting: (this is a pretty common recipe amongst many websites/blogs but I found mine here)

  • 1 cup powdered sugar
  • 1 tablespoon light corn syrup
  • 2 tablespoons milk
  • food coloring to achieve your desired color palette
  • 1 teaspoon vanilla extract

How to Make:

Turn up the tunes that put you in a good mood (My roommate and I are currently huge fans of “Finally Found You” and “Heart Skips A Beat”. We highly recommend.). This should be the first step because tunage makes cooking/baking a lot more enjoyable, particularly when baking up sugar cookies. Add in a sous chef or two and the fun level just increases. Guaranteed.

Once the music is cranked, you’re ready to begin. Preheat your oven to 350 and go find two large-ish mixing bowls.

In the first of those bowls, whisk up the flour, baking powder and salt. Get everything mixed up well.

Now, mix up your butter and sugar in the other bowl. If you’re fancy with a KitchenAid (I didn’t have mine at this point, sadly) electric mixer, set your speed to medium high and go entertain yourself for 2-3 minutes. This is a great opportunity to dance to that excellent music you just put on.

For those without electric mixers, you can still dance. You just get to mix while you’re doing it. Multi-task.

Mix until everything is light and fluffy. Then, slowly beat in each of your eggs. Splash in the vanilla.

Now, on low speed, slowly mix in your flour. Do this in batches or you’ll end up with a huge flour cloud and an immediate need to clean your kitchen. Don’t overmix – you only want to mix until the batter is “just combined” when you turn the mixer off. Trust Real Simple. Don’t overmix.

Spray your cookie sheets with some Pam before dropping “heaping” (Real Simple’s word) spoonfuls of the batter on to your cookie sheet. 3×4 method always works!

The recipe suggests rotating the baking sheets halfway through the baking process, but I just kept a close eye on them and I think you can bake without this step. Unless you have a finicky oven, then maybe you should do the rotating thing. I’ll leave that up to you. Key thing here – bake 12-15 minutes. Your cookies will get a little golden on top and that’s when you’re good to go.

Let them cool down (at least a little bit) before you try one. You WILL want a second. I’d bet just about anything on that.

If you are going to add any frosting, make sure the cookies are completely cooled. Or if you’re impatient like me, just know the frosting will be a little melty. As long as you’re alright with that, proceed.

To mix up your frosting (forewarning – this is more of a  ‘glaze’ than a frosting), stir all (except the food coloring) your ingredients together. Once it’s all thoroughly mixed, start creating your desired color with your food coloring. Remember a few drops of color goes a looonnggg way, so start with a few and add more if needed.


Now I struggled with frosting the first few cookies. The knife wasn’t spreading the frosting well and I was getting frustrated. It was getting all gloopy.


Then I remembered the fun kitchen utensil that usually sits untouched in the drawer – the pastry brush! It’s PERFECT for applying this particular frosting/glaze because the liquid is fairly thin and you can move the glaze around on the cookie much better with the brush than a normal knife or spatula.

The frosting will harden, just give it a little time. You WILL be able to stack and pack these into Tupperware – we brought them on a 3 hour car ride and they survived just fine.

Now set these out for all your friends and just sit back and watch them disappear.

Just…

like…

that.

Snickerdoodles

13 Sep

Before I dive into one of the best cookie recipes EVER, I have a few things I need to share with you (at least read #3 if you don’t want to read #1 and #2)…

1) Can I just say I love September? There are many reasons why this is such a glorious month (cough…birthday…cough, cough), but I truly think Fall foods are some of the most delicious, cozy foods ever. Get excited as I hope to have many blog posts of Fall foods to share with you soon, many I hope to whip up this weekend. This particular weekend is the first where I will not only be home long enough to eat something from my own fridge/cupboards, but I’ll have plenty of “me time” in the kitchen. I can’t tell you how happy that makes me!

2) I have exciting news! Well, exciting to me. I’ve mentioned how much I’ve wanted one of these in a multitude of blog posts…I’ve been staring at them in the store like a kid staring at the puppy section in the pet store. I’ve made the excuses: “it’s too much money”, “where would I store it” blah blah blah. But I give up. I want one!

Yes, yes, you may have already guessed it. A KitchenAid Mixer is going to be purchased this weekend. It’s my birthday present to myself and I’m going to love it to pieces. Now I just have to decide on a color (HELP)!

3) So…with it being Fall, the season of baked goods and with the upcoming purchase of my new BFF the KitchenAid Mixer…I’m going to have all these goodies that I will not be able to eat all by myself. And as it’s a month for cool kids to have birthdays, seems only right to have my first blog giveaway!

Yes, you read correctly. A GIVEAWAY.  Where YOU WIN things. I won’t tell you what is specifically in the giveaway yet, but I’ll have an upcoming post with all the details. It will probably consist of a variety of homemade goodies from me and most likely also involve a spatula or two. Probably some buttons involved somehow if I’m being completely honest. (You should have seen that one coming.)

I will say, all you will have to do to win the giveaway will be to be a follower on the blog. So if you’re one of those readers who has not clicked the ‘Follow’ button yet, this is the time to do it! The Giveaway Post will occur within the next week (I hope!) with details including when the winner will be announced etc…so stay tuned!

Now that all of THAT is out there…we can get to down to the cookies.

I have this thing for chewy cookies, don’t you? If a cookie is crispy or crunchy…meh…not my thing. But chewy cookies, um, YES please. Thus, I was on the mission to find a tasty, CHEWY version of snickerdoodles. And I dare say, I think I was successful. I do warn you, these are one of those cookies where you can’t have just one. Or two. You may find you’ve eaten five before lunchtime. It happens. I won’t judge you because well…that may have happened to someone I know. A friend of mine. Ok, to me. Whatever. I’m NOT ashamed. Nor will you be you be when you taste one!

Few last notes, I chose to use a recipe without cream of tartar (because I didn’t have any) and found this exact same recipe on multiple blogs. So, I’m not sure where the credit should go to, but just know many have tested it out, devoured them, blogged about it etc. TRUST in THEM. And me too I hope!

Ingredients:

  • 2 3/4 cups all purpose flour (I chose to use whole wheat flour, whatever you prefer)
  • 1/2 teaspoon of salt
  • 2 teaspoons of baking powder
  • 1 cup (2 sticks) unsalted butter, softened
  • 1 1/2 cups granulated white sugar
  • 2 eggs

**Important Cooking Notes added on 9/26/12:

  • I’ve had a few readers try out this recipe and would like to mention if you prefer sweeter cookies, adding a dash of vanilla will help with that. I made these without and loved them, but if you’re in need of real sweet taste beyond the cinnamon and sugar, the dash of vanilla will accomplish that.
  • Be sure to use unsalted butter or the cookies may turn out a bit salty. If you must use salted butter, then leave out the 1/2 teaspoon of salt.

Coating:

  • 2 Tablespoons of granulated white sugar
  • 2 teaspoons of ground cinnamon

This is a simple recipe, just requires some blending before you get to the fun part.

First things first – preheat the oven to 350. Grab a medium-sized bowl and mix your flour, salt and baking powder together. Make sure it’s all mixed up well and then set that bowl to the side. (Apologies for the lack of picture. I don’t know where my mind was.)

Grab the butter and make sure it’s SOFT. Trust me. Not kinda soft. Not a little bit soft. SOFT. Or it will stick to your mixer’s beaters and if you’re anything like me…you will get upset…spout off a few choice words…stop the blender…poke the butter out of all the beaters crevices…etc. etc. etc. Just trust me. 🙂

Now take that lovely, soft butter and mix it with your sugar using either your hand mixer or your electric mixer. It takes about 3 minutes, so set a timer, put on some good blending tunes (highly recommend “Don’t Wake Me Up” by Chris Brown…it’s perfect for kitchen tunage needs) and get mixing. It should look pale, fluffy and glorious when you’re finished.

Once the sugar and butter is all blended, mix in your eggs one at a time. When they’re all mixed in, slooooowllllly mix in your flour mixture.

Once it is ALL mixed together, get out a small plate or saucer and pour out your cinnamon and sugar “coating.” A small bowl works too, I just prefer the plate/saucer method.

Roll your dough into small balls, then roll them in your cinnamon/sugar mixture before putting them on a Pam-sprayed cookie sheet. I follow the 3 x 4  method, as you’ve likely seen in past posts.

Bake them for 12 – 15 minutes, until they have a hint of that lovely, golden brown color. Pull ’em out and let them cool. Or don’t let them cool and pop one in your mouth when they’re still warm. Either way, be prepared to be wowed.

Set them out for friends…or maybe just for yourself.

These are also great cookies to pack up and take to the office or a party as they don’t crumble in Tupperware. Trust me! I took these babies all the way to Chicago with me a few weeks ago on the plane and there wasn’t one broken cookie.

So bake yourself a batch and enjoy these delicious little morsels. They’ll be gone before you know it!

Yogurt Popsicles

27 Aug

Popsicles.

Let me tell you, popsicles are sometimes the perfect treat. When you crave something sweet, but not overly so. When you want something cold but are perhaps feeling too lazy (not sure that’s actually possible) to scoop ice cream/frozen yogurt. You want to feel like it’s summer at all times of the year. The list can go on and on.

Back-story: I was shopping at one of my favorite kitchen-y stores (Kitchen Window in Uptown…check it out…it will change your life…and your wallet’s size) shopping for a gift for a friend of mine. As I was perusing the aisles, these popsicle molds jumped into my hands. I swear it.

I came home, all excited about my popsicle molds and then realized…I had no popsicle ‘recipe’ in mind to make. This lasted a few weeks until I found this on pinterest. Success! Unfortunately our fridge/freezer took this particular day to stop working properly. The first round of popsicles never froze and I was stuck using a spoon to eat my semi-cold yogurt concoction. Recommendation – use a freezer that works. Who would have thought, right? I was determined to give them another try though and I can vouch that with a properly cold environment, you’ll have yourself some legitimate and tasty popsicles.

Here we go – three ingredients and some cold temperatures will result in a delicious treat you could legitimately eat for breakfast, a snack OR dessert. (Plus it’s fairly healthy!)Seriously, such a genius idea – thanks to Joylicious for this great recipe!

Ingredients (makes 6-8):

  • 12-16 oz. Greek yogurt, plain or vanilla ( I used a little less than 16 oz. to fill my 6 molds, but you may need more or less depending on the size/amount of your molds)
  • 1/2 cup raw honey
  • 1 cup mixed berries (Fresh or frozen)

Other items you need:

  • Popsicle molds (Hopefully there still available in stores! I would imagine Target, Costco or even Walgreens would have these.)

How to Make:

This is super simple – so it would be a great one to do if you have small people running around. Seeing the popsicles go into the freezer as liquid and come out as wonderfully solid deliciousness would be a fun experience for any kid. Or if you’re 23. Or 49. There’s no age limit on the glory of popsicles.

Mix together your yogurt and honey…


…then gently fold in the berries and ensure they’re not stuck together if you choose the frozen route.

Grab your popsicle molds and pour in your mixture. Some of my bigger berries were easier to push into the mold after I filled it up with the yogurt/honey mixture.

Once all the molds are full, wipe off any excess drips from overflowing, put the tops/bottoms (…is it the top? Or the bottom? Riddle me that.) and put these babies into the freezer. Give them about 3-4 hours, or have them in there overnight.

Aren’t they cute all locked together?

When you take the popsicles out of the molds, be gentle! You may have to warm up the mold a bit with your hands and twist a little with the handle, but it should come out pretty easily.

And look at how pretty this is.

Dig in and enjoy!

Knock You Naked Brownies

19 Jul

Yes, that’s the title of this brownie variety. You wouldn’t be surprised why once you sink your teeth into these. Seriously.

This title I can’t take credit for at all. Though it is pretty perfect. This is a Pioneer Woman recipe and she named these so appropriately.

All you must know is these brownies are excellent. You may lose some socks…your right earring…your Twins hat. Who knows.

A friend of mine made these for a camping trip a few months ago, and they were devoured throughout the weekend. A panful of brownies between three of us girls. Not ashamed. I may have had one for breakfast itself one day.

Ingredients:

  • 1 box (18.5 Ounce) German Chocolate Cake Mix (I Used Betty Crocker as that was literally the only brand of German Chocolate cake mix at my grocery store. I had to scan the shelf for an embarrassing length of time)
  • 1 cup Finely Chopped Pecans
  • 1/3 cup Evaporated Milk
  • 1/2 cup Evaporated Milk (to be added at a separate time)
  • 1/2 cup Butter, Melted
  • 60 whole Caramels, Unwrapped (The bag I found had only 50 in the bag, so I sucked it up and bought 2 bags. 60 is better than 50. Right?)
  • 1/3 cup Semi-Sweet Chocolate Chips
  • 1/4 cup Powdered Sugar

How to Make:

Preheat your oven to 350 degrees and  flour a 9 x 9 square pan. My parents taught me, when in doubt, flour the pan. Especially with brownie/cakes. So flour away!

Then grab yourself a big mixing bowl. Mix up the 1/3 cup evaporated milk…

and the cake mix…

…the melted butter…

…and the chopped pecans (I bought the pre-chopped variety…yes…I’m lazy).

The batter will get a little hard to stir and it will be quite tasty. Forewarning.

Now, to make the first layer of the brownies, split up this batter into two equal halves.

Take one half and press that into the bottom of your floured pan. Pop it into the oven for 8-10 minutes. When it’s all done, set it aside to cool for a bit.

Now, time for some double boiler madness! If you’re a double boiler newbie like me, this is setting a glass bowl (or other heatproof bowl) over a saucepan of boiling water. We’re going to melt some caramels.

First though, you get to peel these suckers. Put on some tunes or press play on your favorite show. The unwrapping (which I took at a leisurely pace) took me about 16 minutes.

1 down…

halfway…

DONE.

Once unwrapped, pour the rest of the evaporated milk (the other 1/2 cup) over the caramels in your heatproof bowl. Set it over your saucepan of boiling water and watch the double boiler effect take place. I stirred fairly consistently to get the whole mixture to melt evenly and to avoid burning.

Once it’s liquid gold like, pour that on top of the first baked brownie layer. If needed, help spread out the caramel with a spatula.

Your third layer is going to be the chocolate chips. Sprinkle those over the caramel.

Yes…it’s going to taste good.

And it gets better.

The rest of the brownie batter is now going to go on top of these three layers. The Pioneer Woman suggests flattening out the top brownie layer on a work surface (I used wax paper) into just about the size of the 9×9 pan. Then transfer the batter to the pan.

I’m not a good transfer-er of brownie batter. Not even close.

I transferred pieces of the batter and then kind of made it look normal-ish once it was all in the pan.

I don’t think you can really tell though, right?!? Plus the peek-a-boo caramel is kinda fun, right?? This is what I told myself at least.

Now…this whole concoction is going in the oven for 20-25 minutes. Your kitchen will smell delicious. Try to contain the drool and spend the 20-25 minutes being productive….doing the dishes…eating string cheese…watching ABC Family shows that you can’t share with the world that you watch (Pretty Little Liars…cough, cough). Either way, when it’s ALL cooked through, pull it out of the oven.

You must let this cool before you eat it. Serious. Ideally, cool to room temperature first and then put it into the fridge to harden. I feed a brownie square to my roomie prior to the fridge step and it was kind of a molten pile of goo. It was tasty goo, mind you. But goo. Definitely refrigerate before you cut and serve them.

After a few hours of you pacing in front of your refrigerator…pull ’em out and sprinkle them with powdered sugar. Cut them into squares…serve them to people you really enjoy.

I chose a pool-ful of people who each had two. Didn’t matter that it was hot out and the brownies were a little melty. They were divine.

Now – your turn. Go make yourself some brownies.

Mint Chocolate Chip Cookies

24 Jun

Mint and chocolate may be the best combination possible. Truly. Well, in my opinion at least.

I found this recipe a few years while flipping through a magazine. There was an advertisement for Betty Crocker sugar cookie mix with this little gem included. I ripped it out and made them immediately. And swooned.

Ok, that’s a bit dramatic, but they are pretty dang great. Betty Crocker knows their stuff. (FYI – I do not know/work for/represent Betty Crocker, I just appreciate this recipe and wanted to share it with you all.)

The best part – because you’re using a sugar cookie mix, these are ALWAYS chewy. No crunchy hard cookie nonsense. If you are into that sort of thing, this recipe isn’t for you. But…if you enjoy a wonderfully, chewy cookie…YOU, my friend, are in luck.

Also another bonus, there is a very simple ingredient list.

Ingredients (Makes approximately 36 cookies):

  • 1 pouch (1 lb 1.5 oz) sugar cookie mix (I use Betty Crocker brand, but if you have a different preferred brand I’m sure it’d work just as great.)
  • 1/2 cup butter or margarine, softened
  • 1/4 to 1/2 teaspoon mint extract (I’ve been told by even those who love mint, error on the side of the 1/4 tsp as these can get a little too minty otherwise.)
  • 6 to 8 drops green food color (I used about 6, which gets them a nice, pale green. If you want a heartier green, be a bit more aggressive with your drop quantities.)
  • 1 egg
  • 1 cup creme de menthe baking chips (I’ve used Andes mints roughly chopped before and they’re delicious. This time I used mint chocolate chips, which are a bit more subtle. Also tasty.)
  • 1 cup semisweet chocolate chunks (I used semisweet chocolate chips, but as long as there is a chocolate shape of some sort in there, I think you’re ok.)

How to Make: 

Preheat your oven to 350. Then, throw everything except the two types of chocolate chips into a bowl and mix thoroughly.

The green food coloring is the perfect indicator of when you’re done with the ‘thoroughly mixing’ piece.

Very helpful.

Then gently fold in the two types of chips until it looks very consistently ‘chippy’. You know what I mean.

Like this.

You may want to take time at this moment to taste the batter. You know, just in case. And yes, I know there’s raw egg in there. Be a daredevil. (But don’t get sick or I’ll feel terrible.)

I always spray my cookie sheets with Pam, although this recipe recommends using an ungreased cookie sheet. If you’re into that – go for it. Then, using the method you like best, place these guys on a 9×13 cookie sheet. (I think using your hands is always the best method but that’s me.)

I put these in a 3×4 pattern which worked perfectly.

Pop ’em in the oven for 8-10 minutes (These always seem to be done at about that 8 minute mark, so watch carefully!)

Cool them for a bit…


…pour a glass of milk…find hungry people…ENJOY!


Strawberry Pie

27 May

Before I dive into strawberry pie (take that literally or figuratively, either would be accurate) I want to let you know some crafting posts are coming up!

Yes, I know. “What? Crafting? You haven’t posted much of anything in that department, I thought you forgot.”

No, I didn’t forget.

I’ve just been very bad at posting about it. So, for those of you reading this blog for more than just the food, crafts are coming! For those not interested in the crafts…crafts are coming anyway. 🙂

Now…back to food. Pie.

Easy as pie has new meaning. This pie recipe is truly simple but doesn’t appear that it would be. Excellent. My kind of recipe!

Found this guy on pinterest, just like the other 83% of the recipes I post on here. I’m sorry, I may be obsessed with that website a wee bit. It’s a great place to stumble on blogs, recipes etc. Really, just about anything that has an image attached to it can be found on that site. Which is why I love it so very much.

The pin took me to a fantastic, new blog I haven’t read before: Mother Thyme. I’m looking forward to trying out some of the other recipes on her site, especially the Avocado Deviled Eggs. YUM.

But we’re focused on strawberry pie here.

Ingredients:

1 frozen pie crust (or you can be a big shot and make your own. I have yet to attempt homemade pie crust…someday.)

Filling:

1 1/2 quarts strawberries, sliced
1 cup sugar
3 tablespoons corn starch
2 tablespoons water

Garnish:

I gave Doug the choice between ice cream or whipped cream. Whipped cream it was for us! But the strawberry pie could go with anything, or, even nothing at all. (I’m sad for you if you chose nothing. Just sayin.)

That is all the ingredients you need to amaze people with your pie skills. I know. It seems TOO simple.

Trust me.

You must make this.

How to Make:

First, bake your pie crust according to the directions on the package. Mine had me prick it all over with a fork before popping it in the oven to pre-bake before filling it with strawberry goodness. Since we’re not baking the entire pie once assembled, your frozen pie crust instructions will most likely also be telling you to bake your pie crust first.

I have a solid hunch on that one.

Set your crust aside to cool while you work on the strawberry filling.

First, slice up your strawberries. All of them.

Then, take 2 cups from the sliced pile and pop them into a blender. Pulse/blend for a enough time to get a mashed pile of strawberries.

Next, grab a small bowl and combine the water and cornstarch. Stir until the cornstarch is dissolved. It’ll look a little like glue at this point. Do not worry – it will not make the pie taste like glue.

Now, grab a small saucepan and combine your cornstarch/water concoction, the strawberry pulp and your cup of sugar. Stir it up over medium-high heat until it “becomes thick and transparent” according to the original recipe on Mother Thyme. You can see if it’s transparent by picking up a spoonful and watching it dribble back into the pan. Sounds weird, but it works.

Once you get to that point of “thick and transparent”, remove it from the heat and let it cool a little bit.

Once it’s cooled down for a few minutes, add in the remaining sliced strawberries. Stir it all up so everything is thoroughly coated. Then, pour into your awaiting pie crust.

You can see from the above picture that we had a rather fragile pie crust and a non-careful cook (guess who). Ah well, we were able to enjoy the pie crust crumbles before we were able to enjoy the real-deal.

Now that your pie is all put together, it needs to chill out for a bit. Since we made this before starting in on the main parts of dinner – parmesan knots and steakhouse pizza – we had our pie chilling for about 2 hours or so. I’m sure you could eat it after 30 minutes or so, but it’ll be best if the whole pie is cool.

Throw on the garnish that makes you smile most. For us, it was whipped cream.

Doug was excited about the upcoming consumption of pie. As were Laura and I. As you will be once you have a pie slice sitting in front of your face.


Now, if this doesn’t make your day/night/life a little bit better, I don’t know what will.


Enjoy!!

PB&J Potato Chip Thumbprint Cookies

14 Apr

Were you the cool kid who put potato chips on your peanut butter and jelly sandwich? I bet you were! There’s just something great about the mix of the sweet jam and the salty chips…not to mention a nice, satisfying crunch every bite would create.

However, if you’re thinking – what the heck!? Chips and PB&J? Who ARE you?! I hope you take second to gather yourself, and then read on. These are cookies that bring the best of the sweet and salty worlds together and I sincerely believe you’ll like them. I made them over Easter and my sample group of friends and family (who are extremely blunt) told me they were very tasty. I even doubled checked with a few to be sure they weren’t ‘just being nice’. I wouldn’t dare blog about a recipe unless it would be delicious for YOU to try!

When the results were in – these were a winner. They’re not hard to make, but are more fun when you have sous chefs or visitors to chat with while making. You’ll see what I mean.

This is a recipe from a blog I LOVE to read – Spoon Fork Bacon. They have it all with great pictures, tasty recipes and my kind of humor.

Ok – lets get to the cookies:

Ingredients:

  • 1/2 cup butter
  • 1/2 cup sugar
  • 1/3 cup light brown sugar
  • 1 egg
  • 1 teaspoon vanilla
  • 1 1/2 cups flour
  • 3/4 teaspoons baking soda
  • 1/8 teaspoon salt
  • 2/3 cup creamy peanut butter (I don’t think crunchy would work as well for baking, but if you’re a rebel, give it a go!)
  • 1 egg white, lightly beaten
  • 2 cups potato chips, crushed (pop the chips into a Ziplic and pound them onto the counter top or roll on top of them with a rolling pin. Or find other demolition possibilities.)
  • ½ cup jam of your choice (I used a classic [in my opinion] – strawberry. Go with your favorite PB&J jam flavor and I’m sure it’ll be an excellent choice.)

How to Make:

Preheat your oven to 375. Don’t forget this step! (We all know I tend to do that. Oopie.)

Grab your hand mixer (if you’re a sad person like me) or a stand mixer (if you’re one of THOSE people…yes, yes we know I want to BE one of THOSE people…) and cream your butter. I highly recommend you don’t attempt to cream together very cold butter. That would be a rookie mistake right?!? Who does that?! I’m sure you see where this is going…don’t be like me. Work with warm, room temp butter or if needed, pop it into the microwave for a few seconds to soften it up. Butter creams so much better when it’s not cold. (Your butter should not be clumpy like my cold butter in the pic below. I did microwave it a bit after this pic and it actually ‘creamed’ instead of ‘clumped’ after that.)

Add in both of your sugars and cream those in with the butter (I was a space cadet and just added the white sugar…as you’ll see in the pictures. Don’t worry, I did eventually come to my senses and add in the brown sugar. But avoid this moment by just adding in both at the right moment.)  This will take you approximately 3 minutes to cream everything together.

Add in the 1 whole egg (save the 1 egg white for later) and vanilla. Keep up the mixing so these two new ingredients are thoroughly mixed in there.

Grab yourself another bowl and “sift together” (Those are the words of gals on Spoon Fork Bacon. I don’t sift due to lack of sifter and just mixed in all ingredients like normal. If you want authentic cookies as SFB describes…sift your little heart out.) your flour, baking soda and salt.

Once it’s all mixed together well – add it  into your other ingredients and stir it all up to combine, just right. At this point add the PB and make sure it’s thoroughly mixed in. You don’t want any cookies to not have the proper PB taste…so mix well people!

Now, the fun part! Find a little bowl for your egg white – this will be station #2. Put your crushed chips out on a cutting board or a big plate – this will be station #3. Spray your cookie sheet with some Pam and lay it nearby – this will be station #4. Ready?

Roll your dough into a ball (station #1)…

…drop into the egg white (station #2)… [ignore the terrible pic…I’m posting just to show what station #2 looks like]

…then pull it out and roll it in potato chips (station #3) … (the below pic is like ‘Where’s Waldo’ except it’s ‘Where’s the Cookie’?)

then place it on your baking sheet (station #4). Rinse, repeat. Oh wait, that’s something else. You know what I mean…repeat until you have 12-15 balls on your baking sheet. Make sure they’re all evenly spaced (laying them in a 3×4 or 3×5 pattern works best I think).

Now for the finishing touch – find your pinkie finger…the left one…or the right one…or your Mom’s…doesn’t matter. Gently press the pinkie into the center of each cookie ball. Now, they’re oven ready!

Put them in the oven for 12-15 minutes. With the egg white coating, you’ll know they’re done when they start to get that golden hue on top. When I pulled out my first batch, the little pinkie prints hadn’t remained as imprinted as I would have liked, so I just went through and gently pressed each one back down again. No fear if this happens to you too!

Place the cookies on a cooling rack or cutting board until they’re cooled completely.

Once they have, NOW is the time for the jam! Fill each cookie with a small amount of jam, just enough to fill up the pinkie indent. Let them sit with their jam filled tops for about an hour, so they can ‘set’ as best as they can. We covered them in Saran wrap (as these were made the night before Easter) and the jam sticks just a bit to the top of the  plastic. But make sure to leave them out for about an hour before wrapping – that should help.

Fill up a glass of milk…grab a cookie (or two!) and enjoy the goodness of sweet/salty heaven. 🙂

Raspberry Oat Crumble Bars

31 Mar

Image

I enjoy creating opportunities to wear my apron. I feel it’s only allowed when baking, not with cooking. Well, perhaps for the especially messy cooking…but with baking it just feels right. Broke out the apron today to bake these wonderful creations – raspberry oat crumble bars.

I found this on fantastic baking blog that I encourage you all to check out: 17 and Baking. I’m excited to try quite a bit of the recipes featured on her blog as I continue expanding my baking repertoire and finding more opportunities to wear my apron.

This recipe is only slightly different than how Elissa wrote in on her blog:

Ingredients:

  • 1 1/4 cups flour
  • 1/3 cup packed light brown sugar
  • 1/2 tsp salt
  • 5 oz (10 Tbsp) cold unsalted butter, cut into pieces
  • 1 Tbsp milk
  • 1 1/2 cups old fashioned oats
  • 3/4 cup seedless raspberry jam (I thoroughly enjoy jam and slathered on slightly more than this. How can there be too much jam?!?)

How to Make:

Preheat your oven to 375 and grab your food processor! Mix up your flour, brown sugar and salt in the food processor first. Then put in the butter pieces and pulse away until the mixture starts to look crumbly. This is a good sign…crumbly = excellent. At this point pour in your Tbsp on milk and make sure it’s mixed in.

Image

For those poor unfortunate souls (name that movie!!) without a food processor…don’t know how you survive. However, you’ll be glad to know this recipe doesn’t discriminate against your lack of materials. Grab a pastry cutter to work everything together or use a fork too. Prior to my wonderful food processor addition, I would use a fork for this sort of task. However – do be careful to not overwork the butter in, you want crumbs. (I speak from experience…a previous fruit crisp was mush because the butter was worked in too much. Not pretty. Don’t be like me.)

At this point, grab your oats and a big bowl. Pour in the mixture from the food processor and work your crumbs and oatmeal into a bigger crumbly mixture. Again – don’t overmix! Just get it all worked in together.

Image

Separate out 3/4 a cup of this mixture (for the delicious topping).

Image

Pour the rest into a buttered or parchment-lined 9×9 pan. Press it down to make the nice, thick crust.

Image

Take your jam and spread it out on top. If you’re as into jam as me, or like raspberry a LOT or you just want to go BIG with your dessert – slather on a bit more than the 3/4 cup. Then, crumble the rest so it’s spread out on top evenly.

Image

Pop it in the oven for 20-25 minutes.

Image

Pull it out to cool when it looks like perfection…I thought that was at 22.3 minutes. But I’ll let you be the judge of that. If you have a cooling rack…or like me, an extra grate from the oven (hey, I’m resourceful!), set it on there to cool. That way to air can move over and under the pan.

Image

When cool, slice it up into squares. I encourage the addition of a little whipped cream…ice cream…frozen yogurt…ANYTHING to jazz it up a bit. If you’re into the ‘simple’ dessert, it’ll still be delicious on its own. But I like to be a proponent of adding ice cream or frozen yogurt.

Image

However it’s served – DIG IN! Happy Saturday!

%d bloggers like this: